CUDA Thread Indexing
August 9, 2023 · 18 min read
If you have any questions, feel free to comment below. Click the block can copy the code.
And if you think it's helpful to you, just click on the ads which can support this site. Thanks!
结合向量相加和图像处理,介绍 CPU 与 GPU 内存操作、线程索引以及 Grid 和 Block 的配置。
我们要处理的问题
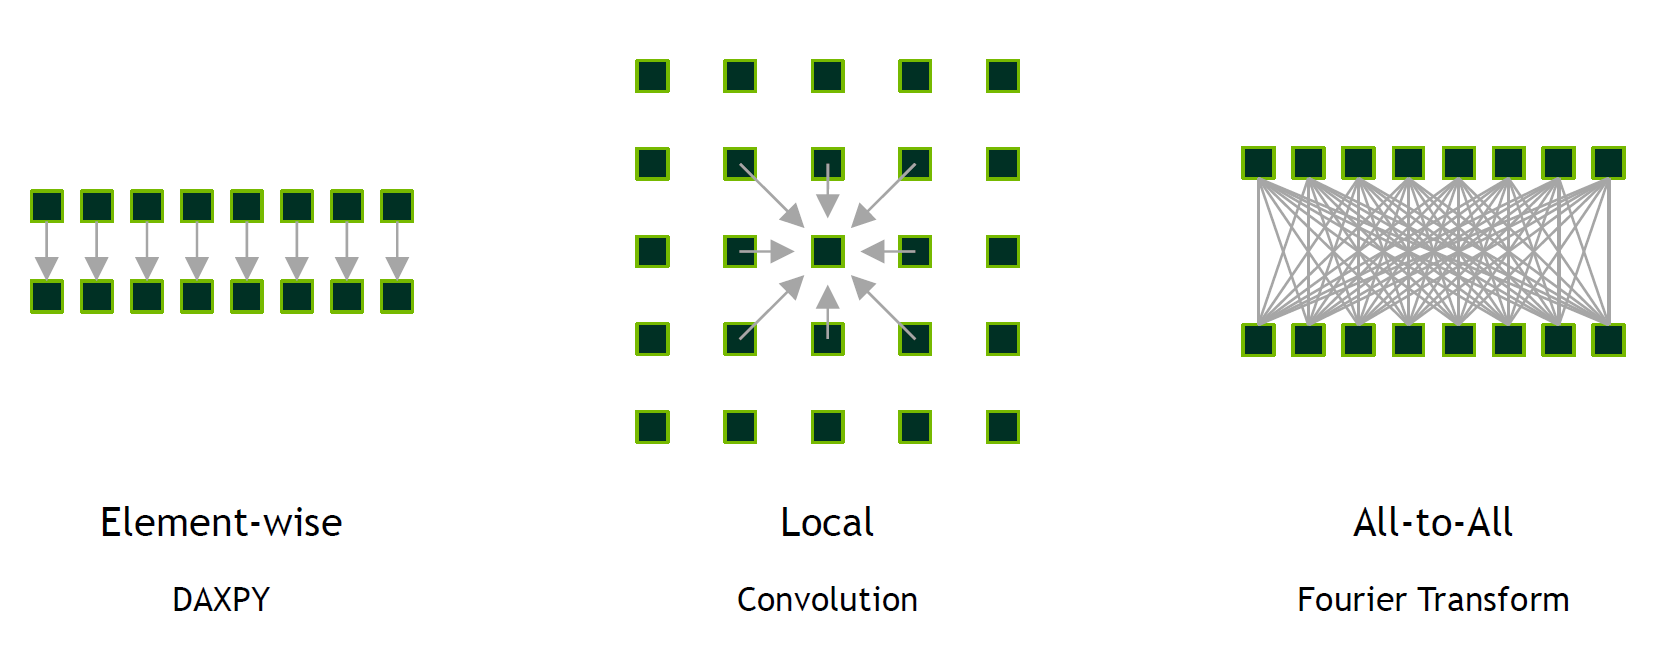
如图,有离散型的,例如向量相加等等。有 local 卷积类型的,用其他一片的元素值求得一个元素。还有 All to All 类型的,类似于傅里叶变换。
回顾一下 CUDA 程序的编写:
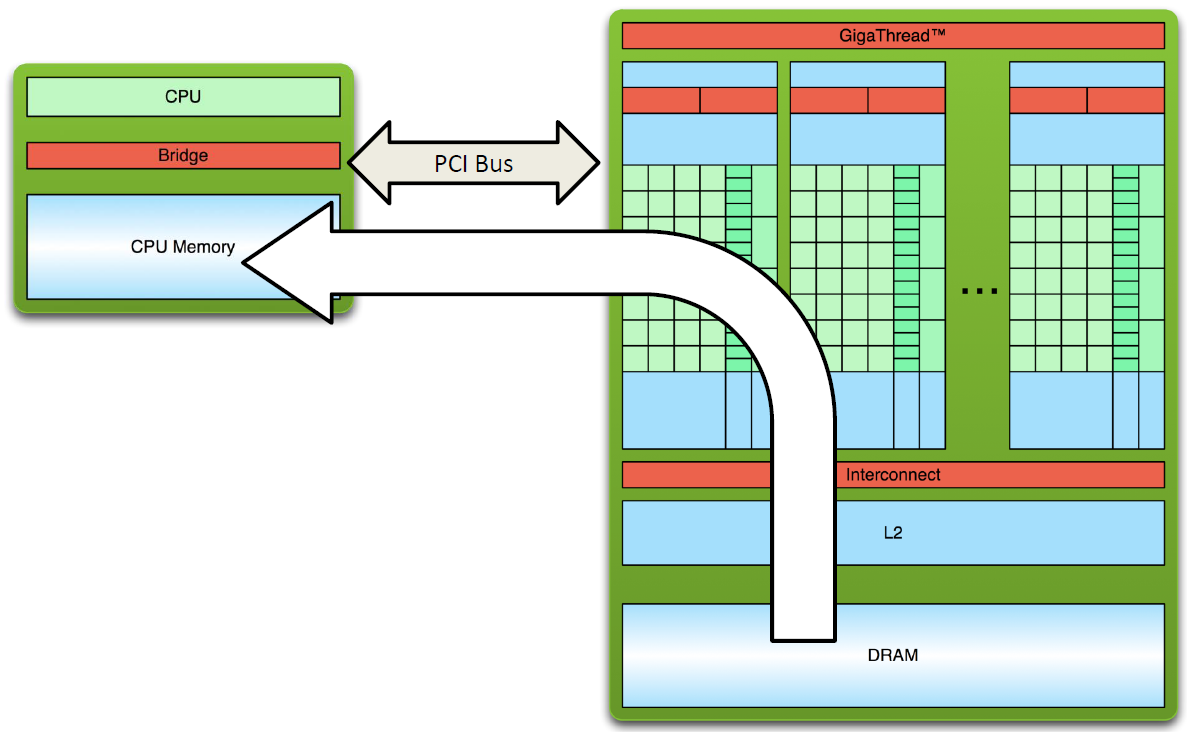
- 把输入数据从 CPU 内存复制到 GPU 显存
- 在执行芯片上缓存数据,加载 GPU 程序并执行
- 将计算结果从 GPU 显存中复制到 CPU 内存中
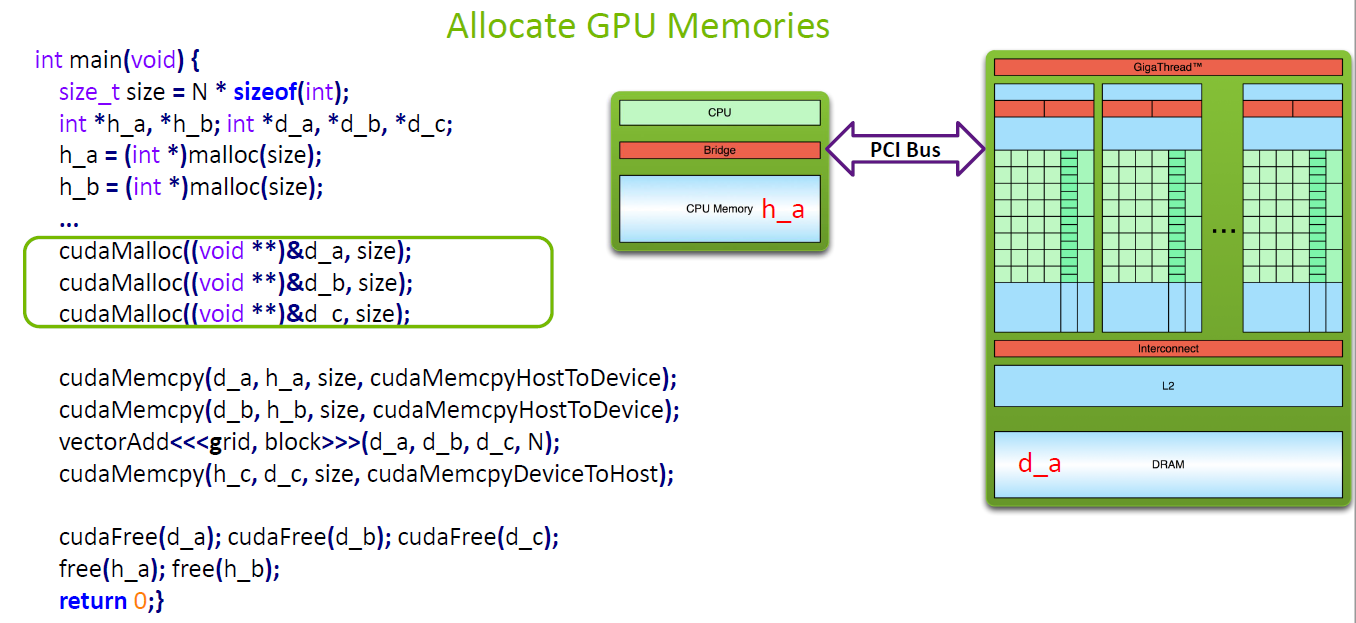
MEMORY ALLOCATION #
分配 GPU 显存的函数:
___host__ ___device__ cudaError_t cudaMalloc (void** devPtr, size_t size)
- devPtr: Pointer to allocated device memory 指向 GPU 的储存单元,因为它没法返回直接指向这个地址的一个空间,所以要修改这个地址空间指针,所以就给它加了一个二重指针。
- Size: Requested allocation size in bytes 比如要分配 int 类型的,这里就是
sizeof int * 1000 - cudaError_t:除了核函数,CUDA 都会返回一个 ErrorType 类型,因为在我们的 gpu 计算当中。是一个异构计算,CPU 不知道 gpu 的一个运行状态,这个相当于返回了一个当前这个函数执行的一个状态。
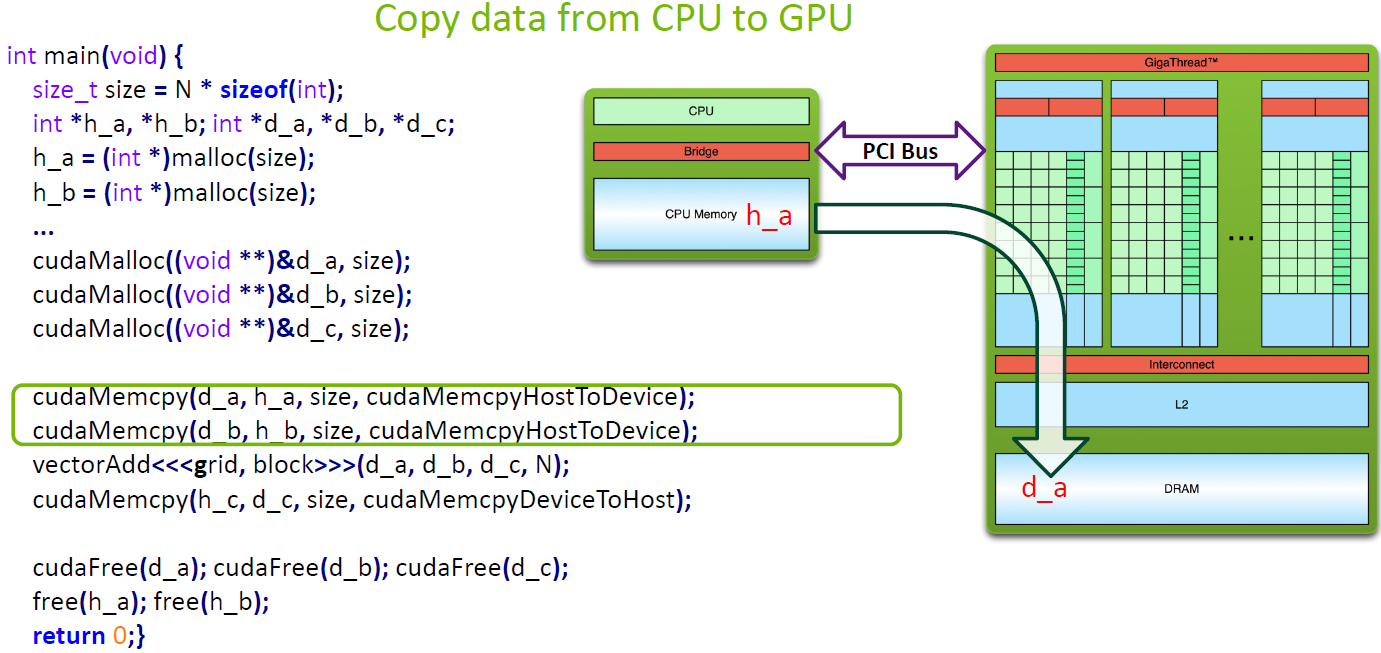
MEMORY COPY BETWEEN CPU AND GPU #
cudaMemcpy (void *dst, const void *src, size_t count, cudaMemcpyKind kind)
将数据从 CPU 传输到 GPU 或者从 GPU 传输到 CPU
- dst: destination memory address
- src: source memory address
- count: size in bytes to copy
- Kind: direction of the copy
cudaMemcpyKind 传输类型
- cudaMemcpyHostToDevice
- cudaMemcpyDeviceToHost
- cudaMemcpyDeviceToDevice
- cudaMemcpyHostToHost
CUDA 的线程索引 #
这里有一个长度为 32 的数组,现在用 32 个线程去处理这个数组,如何确定线程执行的数据。
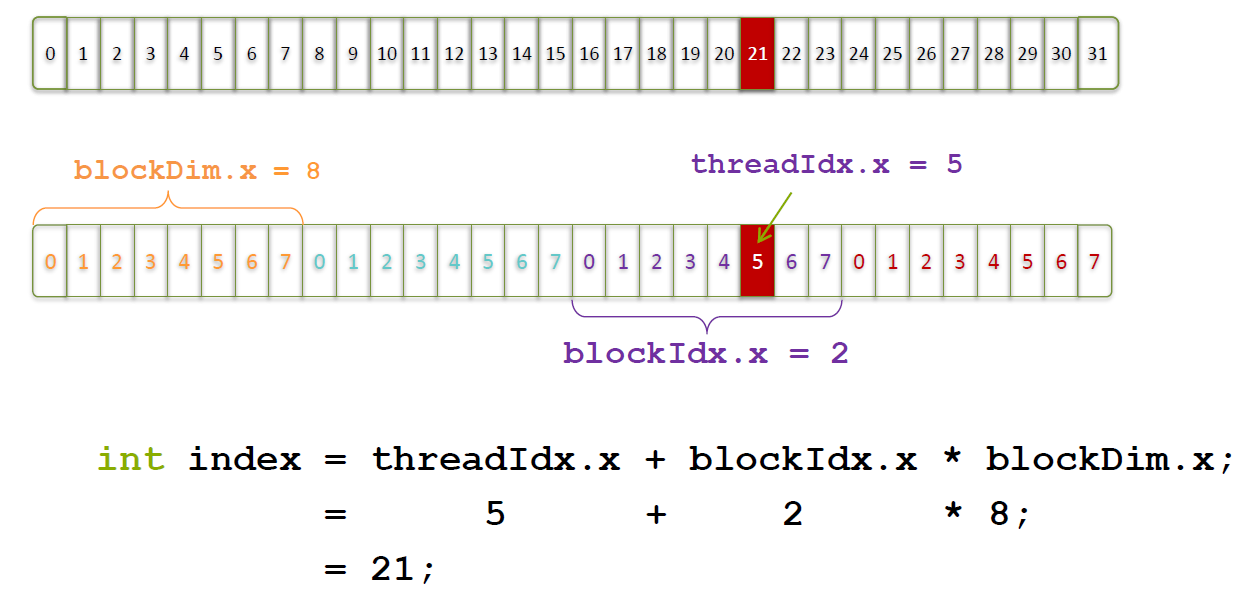
int index = threadIdx.x + blockIdx.x * blockDim.x;
		  =    5        +     2      *    8;
          =   21;
block 的编号是从 0 开始的,因此这里 blockIdx.x 指当前 block 的索引值。blockDim.x 指每个 block 中有多少个元素。最终算出当前线程在全局中的 index 值。可以与上面的数组进行一一对应。
PARALLELIZATION OF VECTORADD #
更普遍的过程
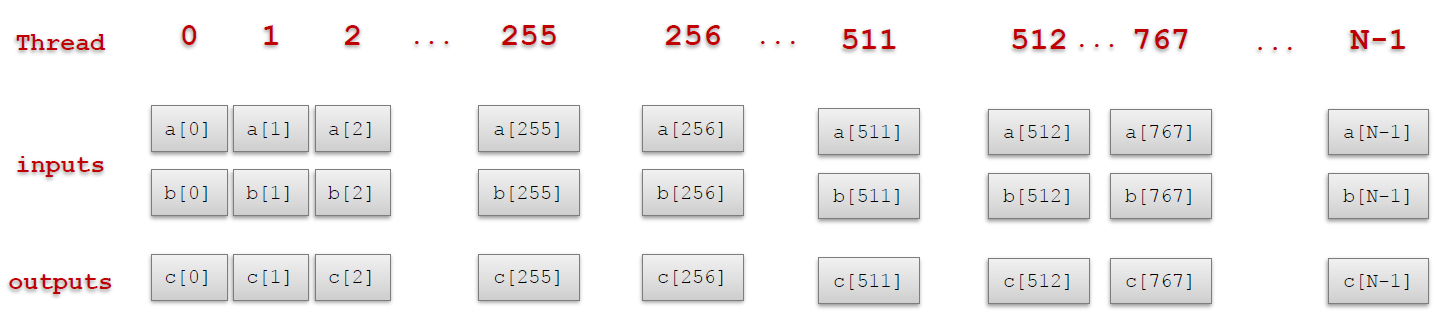
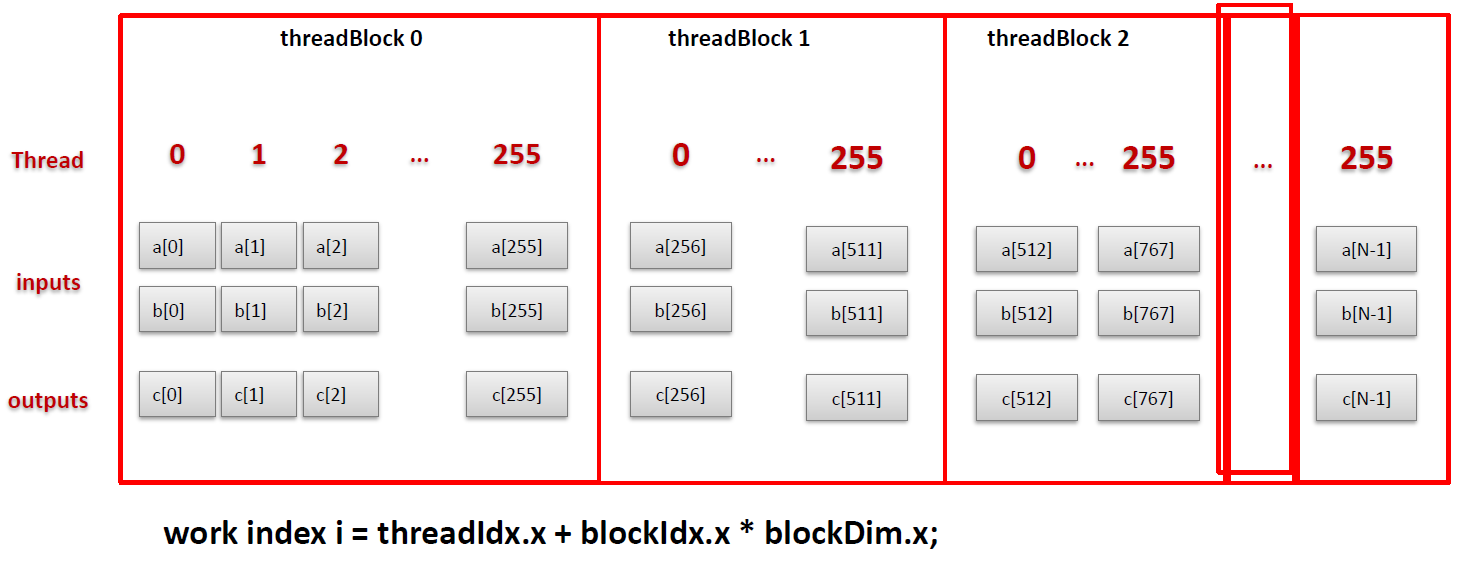 实现过程
实现过程
__global__ void add(const double *x, const double *y,double *z)
{
	const int n = blockDim.x * blockldx.x + threadldx.x;
	z[n] = x[n] + y[n];
}
每个线程都执行相同的命令
CUDA PROGRAMMING BY EXAMPLE #
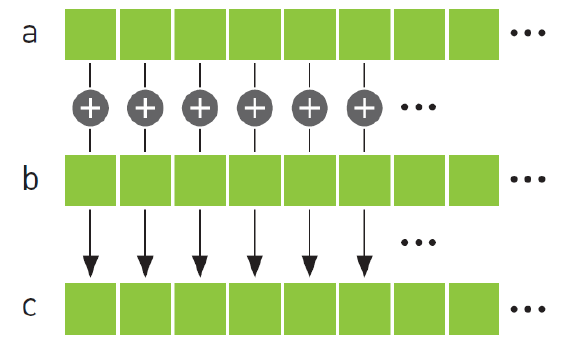
Parallelizable problem:
- c = a+ b
- a, b, c are vectors of length N
CPU 实现 #
void main(){
	int size = N * sizeof(int);
	int *a,*b,*c;
	a = (int *)malloc(size);
	b = (int *)malloc(size);
	c = (int *)malloc(size);
	memset(c, O, size);
	init_rand_f(a, N);
	init_rand_f(b,N);

	vecAdd(N, a, b, c);
}

void vecAdd (int n, int *a, int *b, int *c)
{
	for(int i = O; i< n; i++)
	{
		c[i]=a[i]+ b[i];
	}
}
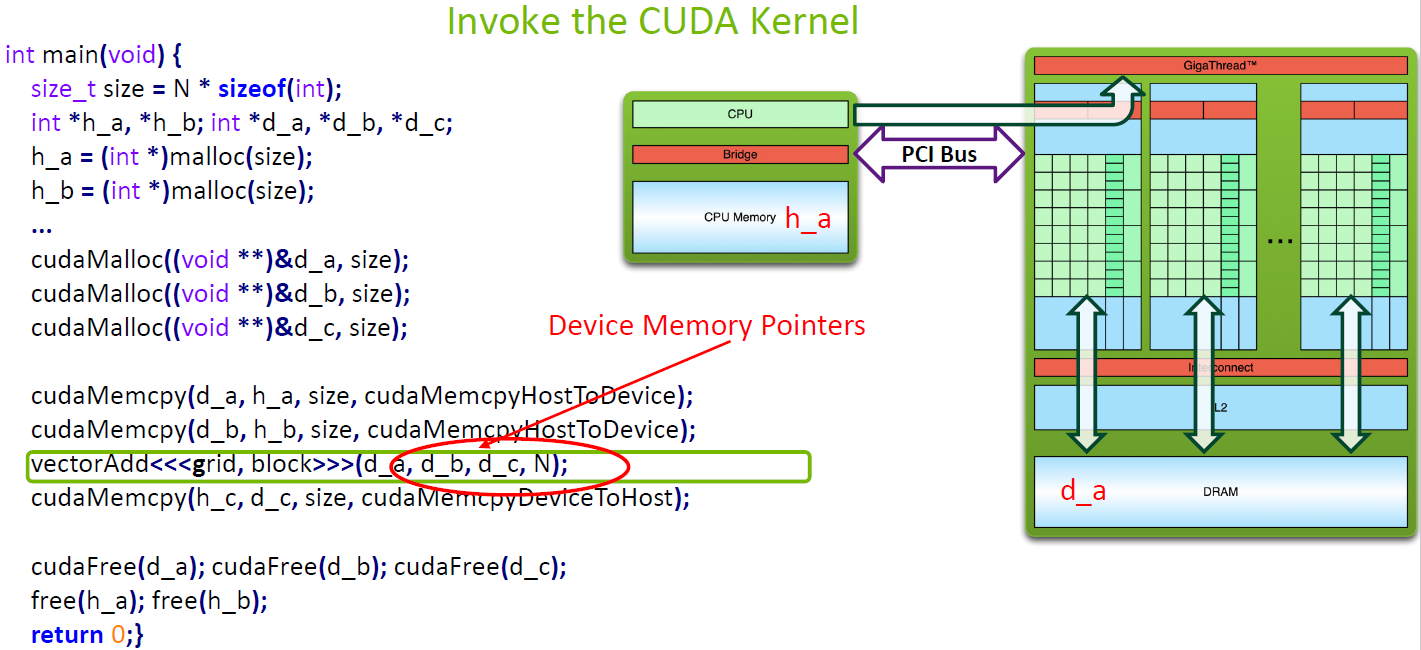
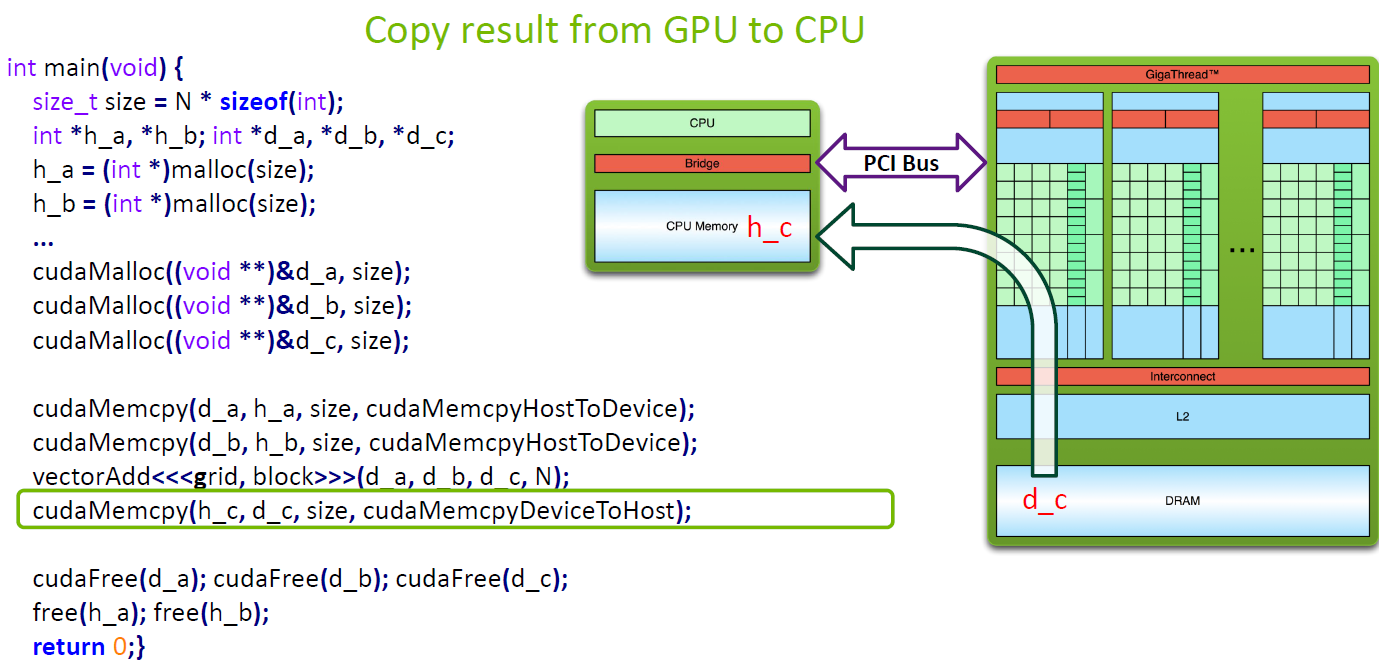
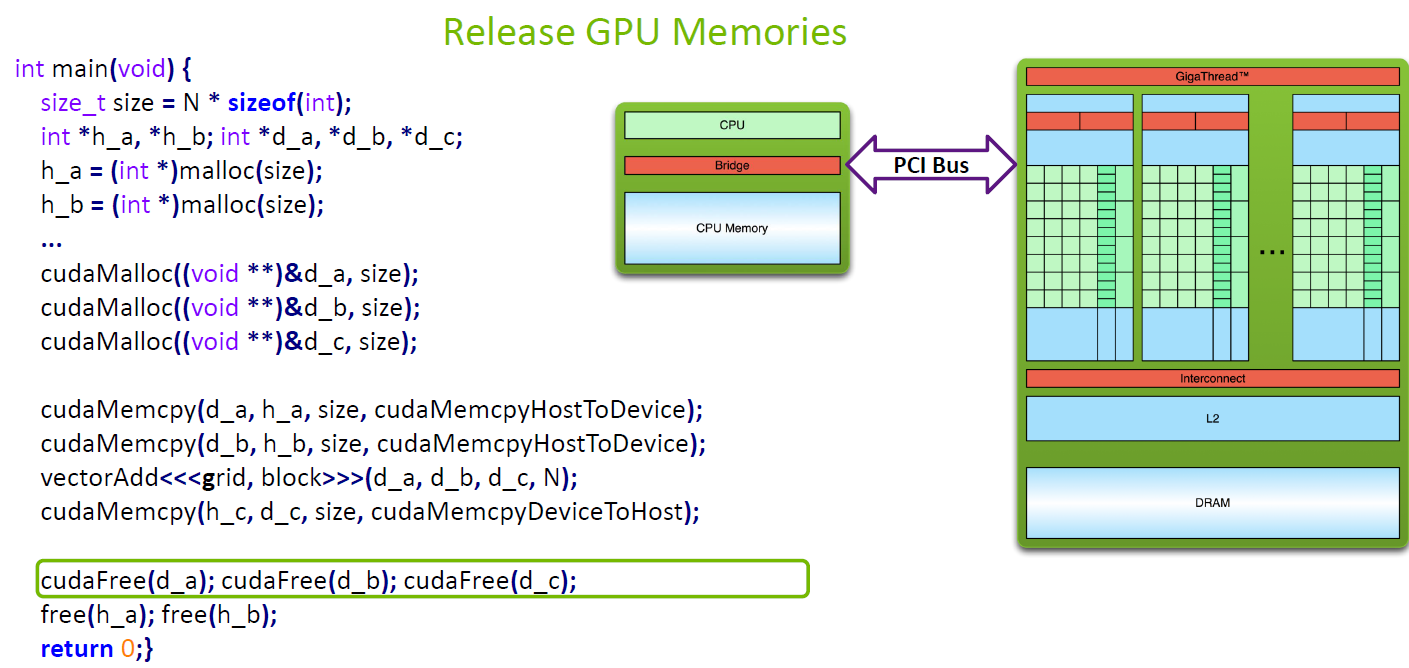
GPU 实现 #
int main(void) {
	size_t size =N * sizeof(int);
	int *h_a, *h_b;
	int *d_a, *d_b,*d_c;
	h_a = (int*)malloc(size);
	h_b = (int *)malloc(size);
	...
	cudaMalloc((void **)&d_a, size);
	cudaMalloc((void **)&d_b, size);
	cudaMalloc((void**)&d c, size);

	cudaMemcpy(d_a, h_a, size, cudaMemcpyHostToDevice);
	cudaMemcpy(d_b, h_b, size, cudaMemcpyHostToDevice);
	vectorAdd<<<grid, block>>>(d_a, d_b, d_c, N);
	cudaMemcpy(h_c, d_c, size, cudaMemcpyDeviceToHost);

	cudaFree(d_a); cudaFree(d_b); cudaFree(d_c);
	free(h_a); free(h_b);
	return 0;
}
如何设置 Gridsize & Blocksize #
block_size = 128;
grid_size =(N + block_size - 1) / block_size;
每个 BLOCK 可以申请多少个线程:

可见,一共是 1024 * 1024 * 64,每个方向的线程不能超过 1024,z 方向的比较特殊,最大是 64 个。(注意:如果 x 方向上是 32 个线程,则 y 方向上线程数不能超过 32 个)。
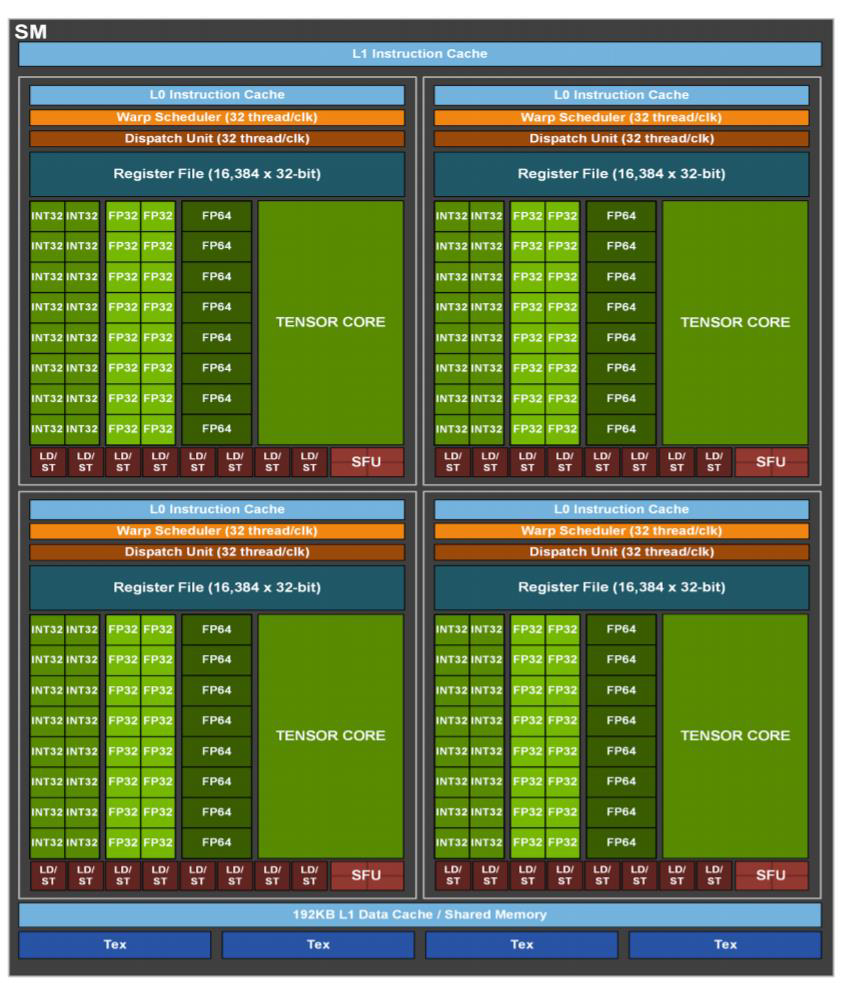
同一个 block 所有线程都是运行在一个 SM 当中,这个一个个 SM 里边,资源包括这个寄存器,共享存储,计算核心都是有限度的。申请过多的资源会导致例如寄存器溢出等等问题。
CUDA 的线程分配 #
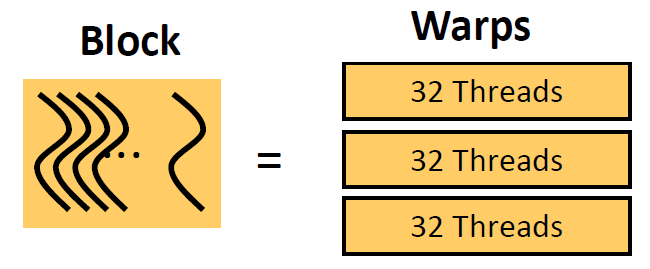
Warp is successive 32 threads in a block Warp 是一个 block 中连续的 32 个线程
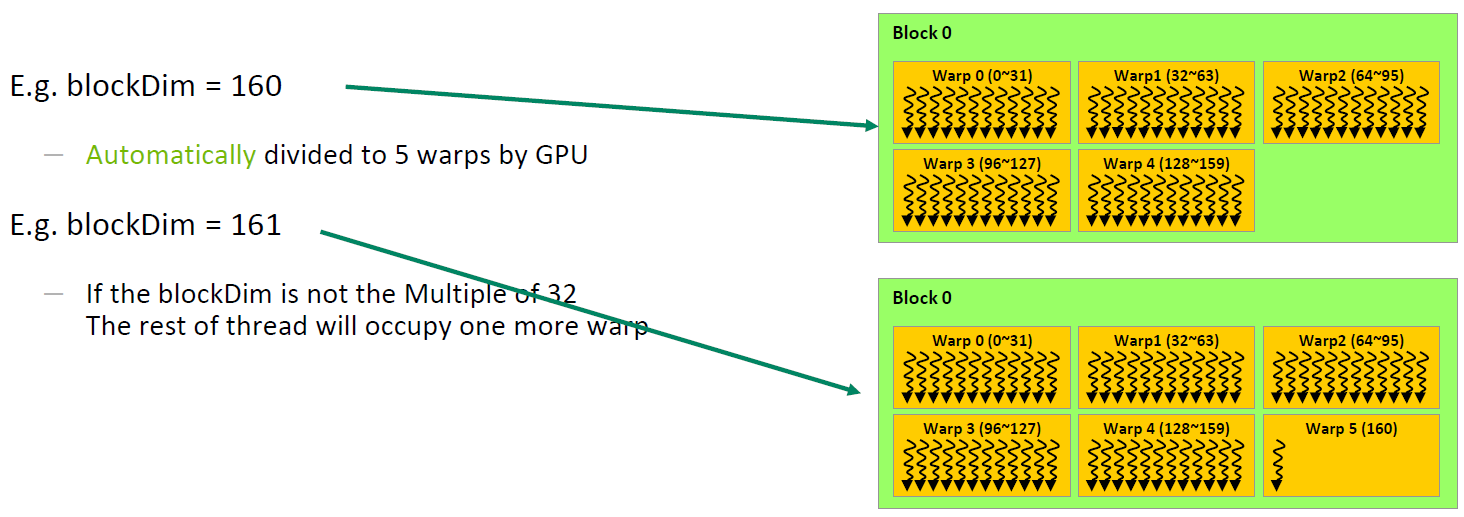 当线程数为 161 时,有一个 WAP 当中的其他的线程,其他的处理器是闲置等待或者说浪费的,要尽量避免这种情况。
因此,尽可能地将线程数设置为 32 的倍数。
如果我们的数据过大,线程不够用怎么办? #
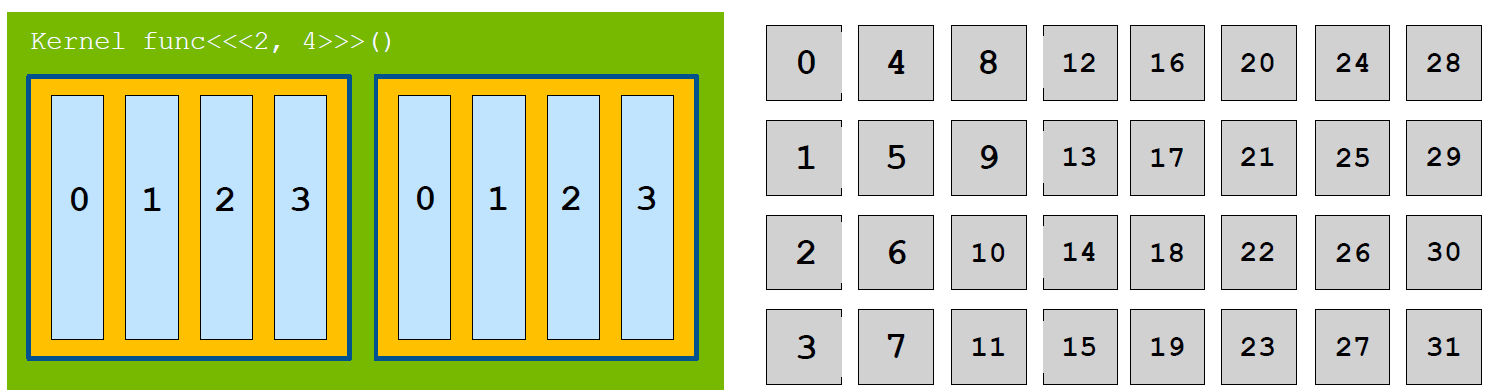
例如一共有 8 个线程 («<2, 4»>两个 block,每个 block 中 4 个线程),处理 32 个数据,这时候一个线程需要处理多个数据,寻找数据之间索引的内在关系即可,例如第 0 个线程处理序号 0,8,16,24 的数据。可以通过 for 循环实现。
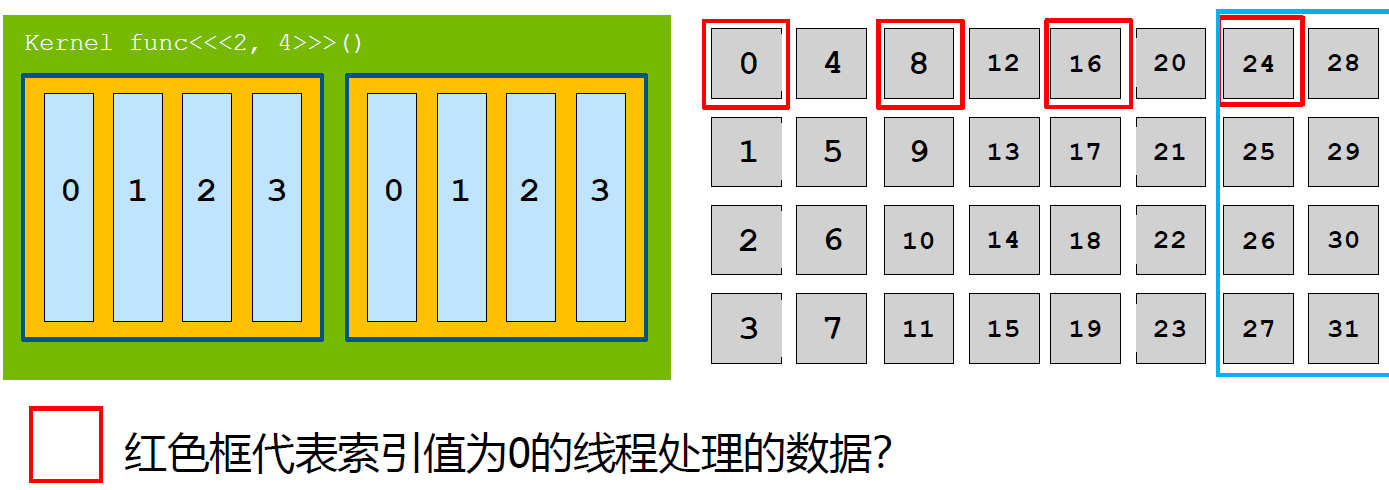
__global__ add(const double *x, const double *y, double *z, int n)
{
	int index = blockDim.x * blockldx.x + threadldx.x;
	// stride 可以理解为所有线程的个数 = 每个block中元素 * 每个grid中包含多少个block
	int stride = blockDim.x * gridDim.x;
	// 先处理本身的index,然后加上stride处理后面的index
	for(; index <n; index +=stride)
		z[index] = x[index] + y[index];
}
如果我们的数据过小,线程太多怎么办? #
需要做一个越界的判断:
if( blockDim.x * blockldx.x + threadldx.x <count )
防止越界,如果越界,则它在异构计算中非常难处理。例如在矩阵运算中,二维的数据如果产生越界的话,会将原来 y 维的数据读取到 x 维上。
Local #
此外,还有一个 local 的问题。
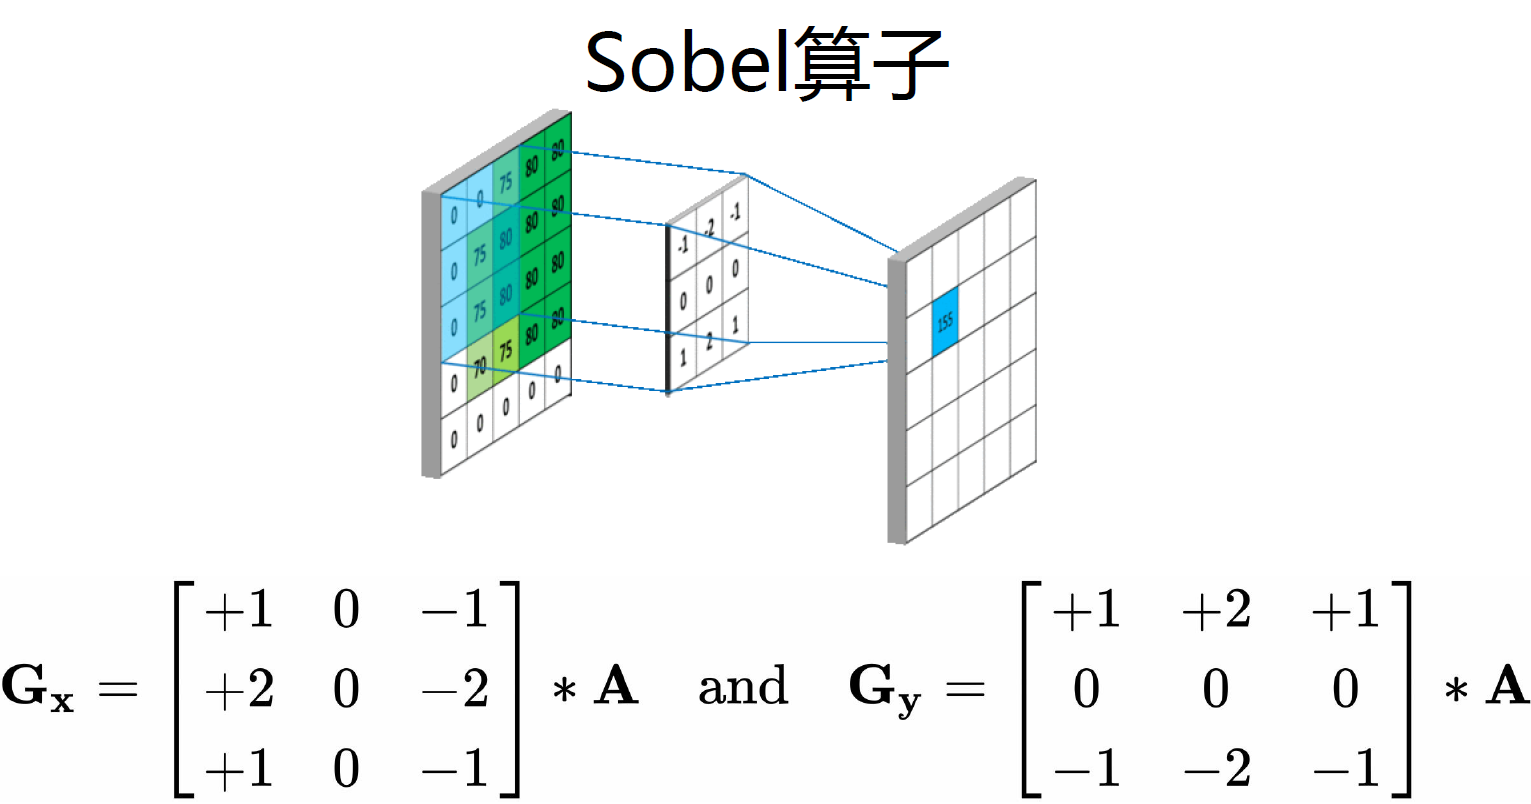 就是得到一个算子,将算子与原矩阵相乘,最后得到个方向的梯度。具体在实验中可以展示。
CUDA 线程组织代码实现 #
本次有关以下内容:
- 使用多个线程的核函数
- 使用线程索引
- 多维网络
- 网格与线程块
1.那我们如何能够得到一个线程在所有的线程中的索引值? 比如:我们申请了4个线程块,每个线程块有8个线程,那么我们就申请了32个线程,那么我需要找到第3个线程块(编号为2的 block)里面的第6个线程(编号为5的 thread)在所有线程中的索引值怎么办?
这时,我们就需要blockDim 和 gridDim这两个变量:
- gridDim表示一个grid中包含多少个block
- BlockDim 表示一个 block 中包含多少个线程
也就是说,在上面的那个例子中,gridDim.x=4, blockDim.x=8
那么,我们要找的第22个线程(编号为21)的唯一索引就应该是,index = blockIdx.x * blockDim.x + threadIdx.x
接下来,通过完成一个向量加法的实例来实践一下,实现的 cpu 代码如下:
    #include <math.h>
    #include <stdlib.h>
    #include <stdio.h>

    void add(const double *x, const double *y, double *z, const int N)
    {
        for (int n = 0; n < N; ++n)
        {
            z[n] = x[n] + y[n];
        }
    }

    void check(const double *z, const int N)
    {
        bool has_error = false;
        for (int n = 0; n < N; ++n)
        {
            if (fabs(z[n] - 3) > (1.0e-10))
            {
                has_error = true;
            }
        }
        printf("%s\n", has_error ? "Errors" : "Pass");
    }


    int main(void)
    {
        const int N = 100000000;
        const int M = sizeof(double) * N;
        double *x = (double*) malloc(M);
        double *y = (double*) malloc(M);
        double *z = (double*) malloc(M);

        for (int n = 0; n < N; ++n)
        {
            x[n] = 1;
            y[n] = 2;
        }

        add(x, y, z, N);
        check(z, N);

        free(x);
        free(y);
        free(z);
        return 0;
    }
为了完成这个程序,我们先要将数据传输给 GPU,并在 GPU 完成计算的时候,将数据从 GPU 中传输给 CPU 内存。这时我们就需要考虑如何申请 GPU 存储单元,以及内存和显存之前的数据传输。我们利用 cudaMalloc()来进行 GPU 存储单元的申请,利用 cudaMemcpy()来完成数据的传输。
#include <math.h>
#include <stdio.h>

void __global__ add(const double *x, const double *y, double *z, int count)
{
    const int n = blockDim.x * blockIdx.x + threadIdx.x;
    // 注意判断边界条件
	if( n < count)
	{
	    z[n] = x[n] + y[n];
	}

}
void check(const double *z, const int N)
{
    bool error = false;
    for (int n = 0; n < N; ++n)
    {
        if (fabs(z[n] - 3) > (1.0e-10))
        {
            error = true;
        }
    }
    printf("%s\n", error ? "Errors" : "Pass");
}


int main(void)
{
    const int N = 1000;
    const int M = sizeof(double) * N;
    double *h_x = (double*) malloc(M);
    double *h_y = (double*) malloc(M);
    double *h_z = (double*) malloc(M);

    for (int n = 0; n < N; ++n)
    {
        h_x[n] = 1;
        h_y[n] = 2;
    }

    double *d_x, *d_y, *d_z;
    cudaMalloc((void **)&d_x, M);
    cudaMalloc((void **)&d_y, M);
    cudaMalloc((void **)&d_z, M);
    cudaMemcpy(d_x, h_x, M, cudaMemcpyHostToDevice);
    cudaMemcpy(d_y, h_y, M, cudaMemcpyHostToDevice);

    const int block_size = 128;
    const int grid_size = (N + block_size - 1) / block_size;
    add<<<grid_size, block_size>>>(d_x, d_y, d_z, N);

    cudaMemcpy(h_z, d_z, M, cudaMemcpyDeviceToHost);
    check(h_z, N);

    free(h_x);
    free(h_y);
    free(h_z);
    cudaFree(d_x);
    cudaFree(d_y);
    cudaFree(d_z);
    return 0;
}
然后先进行编译
!/usr/local/cuda/bin/nvcc vectorAdd.cu -o vectorAdd
然后执行
!./vectorAdd
利用 nvprof 查看程序性能
!sudo /usr/local/cuda/bin/nvprof ./vectorAdd
思考:
- 如果我们设置的线程数过大,比如设置 grid_size = (N + block_size - 1) / block_size + 10000,会产生什么后果?如何避免这种后果?
- 如果我们的要处理的数据太多,远远超过我们能申请的线程数怎么办?以上面的向量相加为例, 修改代码, 要求: 只能使用 32 个 block, 每个 block 里面有 32个线程
- 修改
sobel.cu完成 Sobel 边缘检测 kernel 优化。
#include <opencv2/opencv.hpp>
#include <iostream>

using namespace std;
using namespace cv;

//GPU实现Sobel边缘检测
//             x0 x1 x2
//             x3 x4 x5
//             x6 x7 x8
__global__ void sobel_gpu(unsigned char* in, unsigned char* out, int imgHeight, int imgWidth)
{

}

//CPU实现Sobel边缘检测
void sobel_cpu(Mat srcImg, Mat dstImg, int imgHeight, int imgWidth)
{
    int Gx = 0;
    int Gy = 0;
    for (int i = 1; i < imgHeight - 1; i++)
    {
        uchar* dataUp = srcImg.ptr<uchar>(i - 1);
        uchar* data = srcImg.ptr<uchar>(i);
        uchar* dataDown = srcImg.ptr<uchar>(i + 1);
        uchar* out = dstImg.ptr<uchar>(i);
        for (int j = 1; j < imgWidth - 1; j++)
        {
            Gx = (dataUp[j - 1] + 2 * data[j - 1] + dataDown[j - 1])-(dataUp[j + 1] + 2 * data[j + 1] + dataDown[j + 1]);
            Gy = (dataUp[j - 1] + 2 * dataUp[j] + dataUp[j + 1]) - (dataDown[j - 1] + 2 * dataDown[j] + dataDown[j + 1]);
            out[j] = (abs(Gx) + abs(Gy)) / 2;
        }
    }
}

int main()
{
    //利用opencv的接口读取图片
    Mat img = imread("1.jpg", 0);
    int imgWidth = img.cols;
    int imgHeight = img.rows;

    //利用opencv的接口对读入的grayImg进行去噪
    Mat gaussImg;
    GaussianBlur(img, gaussImg, Size(3, 3), 0, 0, BORDER_DEFAULT);
    //CPU结果为dst_cpu, GPU结果为dst_gpu
    Mat dst_cpu(imgHeight, imgWidth, CV_8UC1, Scalar(0));
    Mat dst_gpu(imgHeight, imgWidth, CV_8UC1, Scalar(0));


    //调用sobel_cpu处理图像
    sobel_cpu(gaussImg, dst_cpu, imgHeight, imgWidth);

    //申请指针并将它指向GPU空间
    size_t num = imgHeight * imgWidth * sizeof(unsigned char);
    unsigned char* in_gpu;
    unsigned char* out_gpu;
    cudaMalloc((void**)&in_gpu, num);
    cudaMalloc((void**)&out_gpu, num);
    //定义grid和block的维度(形状)
    dim3 threadsPerBlock(32, 32);
    dim3 blocksPerGrid((imgWidth + threadsPerBlock.x - 1) / threadsPerBlock.x,
        (imgHeight + threadsPerBlock.y - 1) / threadsPerBlock.y);

    //将数据从CPU传输到GPU
    cudaMemcpy(in_gpu, img.data, num, cudaMemcpyHostToDevice);
    //调用在GPU上运行的核函数
    sobel_gpu<<<blocksPerGrid,threadsPerBlock>>>(in_gpu, out_gpu, imgHeight, imgWidth);

    //将计算结果传回CPU内存
    cudaMemcpy(dst_gpu.data, out_gpu, num, cudaMemcpyDeviceToHost);
    imwrite("save.png", dst_gpu);
    //显示处理结果, 由于这里的Jupyter模式不支持显示图像, 所以我们就不显示了
    //imshow("gpu", dst_gpu);
    //imshow("cpu", dst_cpu);
    //waitKey(0);
    //释放GPU内存空间
    cudaFree(in_gpu);
    cudaFree(out_gpu);
    return 0;
}
修改后结果如下:
#include <opencv2/opencv.hpp>
#include <iostream>

using namespace std;
using namespace cv;

//GPU实现Sobel边缘检测
//             x0 x1 x2
//             x3 x4 x5
//             x6 x7 x8
__global__ void sobel_gpu(unsigned char* in, unsigned char* out, int imgHeight, int imgWidth)
{
    int x = threadIdx.x + blockDim.x * blockIdx.x;
    int y = threadIdx.y + blockDim.y * blockIdx.y;
    int index = y * imgWidth + x;
    int Gx = 0;
    int Gy = 0;
    unsigned char x0, x1, x2, x3, x4, x5, x6, x7, x8;
    if ((x > 0) && (x < imgWidth-1) && (y>0) && (y < imgHeight-1))
    {
        x0 = in[(y - 1) * imgWidth + x - 1];
        x1 = in[(y - 1) * imgWidth + x ];
        x2 = in[(y - 1) * imgWidth + x + 1];
        x3 = in[(y) * imgWidth + x - 1];
        x4 = in[(y ) * imgWidth + x ];
        x5 = in[(y ) * imgWidth + x + 1];
        x6 = in[(y + 1) * imgWidth + x - 1];
        x7 = in[(y + 1) * imgWidth + x ];
        x8 = in[(y + 1) * imgWidth + x + 1];
        Gx = (x0 + x3 * 2 + x6) - (x2 + x5 * 2 + x8);
        Gy = (x0 + x1 * 2 + x2) - (x6 + x7 * 2 + x8);
        out[index] = (abs(Gx) + abs(Gy)) / 2;
    }
}

//CPU实现Sobel边缘检测
void sobel_cpu(Mat srcImg, Mat dstImg, int imgHeight, int imgWidth)
{
    int Gx = 0;
    int Gy = 0;
    for (int i = 1; i < imgHeight - 1; i++)
    {
        uchar* dataUp = srcImg.ptr<uchar>(i - 1);
        uchar* data = srcImg.ptr<uchar>(i);
        uchar* dataDown = srcImg.ptr<uchar>(i + 1);
        uchar* out = dstImg.ptr<uchar>(i);
        for (int j = 1; j < imgWidth - 1; j++)
        {
            Gx = (dataUp[j - 1] + 2 * data[j - 1] + dataDown[j - 1])-(dataUp[j + 1] + 2 * data[j + 1] + dataDown[j + 1]);
            Gy = (dataUp[j - 1] + 2 * dataUp[j] + dataUp[j + 1]) - (dataDown[j - 1] + 2 * dataDown[j] + dataDown[j + 1]);
            out[j] = (abs(Gx) + abs(Gy)) / 2;
        }
    }
}

int main()
{
    //利用opencv的接口读取图片
    Mat img = imread("1.jpg", 0);
    int imgWidth = img.cols;
    int imgHeight = img.rows;

    //利用opencv的接口对读入的grayImg进行去噪
    Mat gaussImg;
    GaussianBlur(img, gaussImg, Size(3, 3), 0, 0, BORDER_DEFAULT);
    //CPU结果为dst_cpu, GPU结果为dst_gpu
    Mat dst_cpu(imgHeight, imgWidth, CV_8UC1, Scalar(0));
    Mat dst_gpu(imgHeight, imgWidth, CV_8UC1, Scalar(0));


    //调用sobel_cpu处理图像
    sobel_cpu(gaussImg, dst_cpu, imgHeight, imgWidth);

    //申请指针并将它指向GPU空间
    size_t num = imgHeight * imgWidth * sizeof(unsigned char);
    unsigned char* in_gpu;
    unsigned char* out_gpu;
    cudaMalloc((void**)&in_gpu, num);
    cudaMalloc((void**)&out_gpu, num);
    //定义grid和block的维度(形状)
    dim3 threadsPerBlock(32, 32);
    dim3 blocksPerGrid((imgWidth + threadsPerBlock.x - 1) / threadsPerBlock.x,
        (imgHeight + threadsPerBlock.y - 1) / threadsPerBlock.y);

    //将数据从CPU传输到GPU
    cudaMemcpy(in_gpu, img.data, num, cudaMemcpyHostToDevice);
    //调用在GPU上运行的核函数
    sobel_gpu<<<blocksPerGrid,threadsPerBlock>>>(in_gpu, out_gpu, imgHeight, imgWidth);

    //将计算结果传回CPU内存
    cudaMemcpy(dst_gpu.data, out_gpu, num, cudaMemcpyDeviceToHost);
    imwrite("save.png", dst_gpu);
    //显示处理结果, 由于这里的Jupyter模式不支持显示图像, 所以我们就不显示了
    //imshow("gpu", dst_gpu);
    //imshow("cpu", dst_cpu);
    //waitKey(0);
    //释放GPU内存空间
    cudaFree(in_gpu);
    cudaFree(out_gpu);
    return 0;
}
Related readings
- Writing Your First CUDA Program
- CUDA Programming Model
- GPU Hardware Architecture
- Introduction to CUDA and Linux Basics
- Introduction to CUDA
If you want to follow my updates, or have a coffee chat with me, feel free to connect with me: