CUDA Matrix Multiplication and Transpose
August 10, 2023 · 11 min read
If you have any questions, feel free to comment below. Click the block can copy the code.
And if you think it's helpful to you, just click on the ads which can support this site. Thanks!
通过代码实践 CUDA 矩阵乘法与转置,理解 GPU 存储单元与并行计算。
CUDA 并行计算基础 #
GPU 的存储单元 #
GPU 中存储单元有很多种类,例如: Each thread can:
- R/W per-thread registers
- R/W per-thread local memory
- R/W per-block shared memory
- R/W per-grid global memory
- Read only per-grid constant memory
- Read only per-grid texture memory
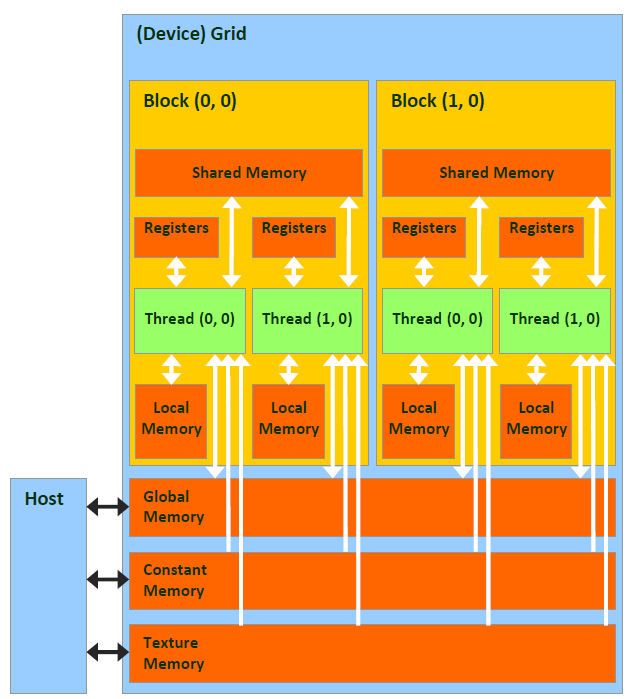 这里 The host 与 Global、Constant、Texture 进行交互。
MEMORY ALLOCATION/ RELEASECPU memory CPU memory:
- malloc ()
- memset
- free() GPU memory:
- cudaMalloc
- cudaMemset
- cudaFree
矩阵相乘 #
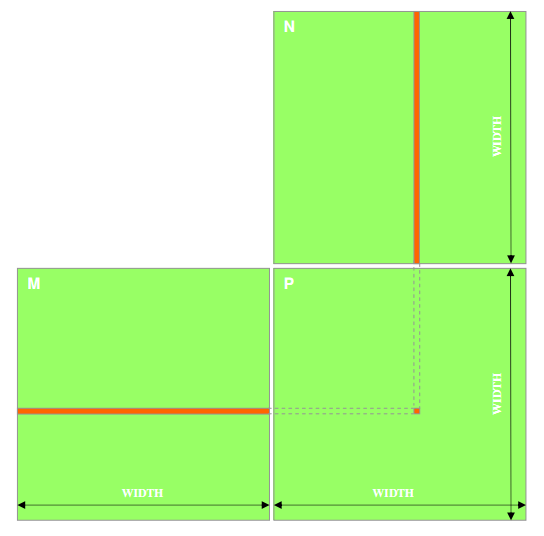 P = M * N
假定 M and N 是方阵
P = M * N
假定 M and N 是方阵

void cpu_matrix_mult(int *h_m, int *h_n, int *h_result, int m, int n, int k)
{
	for (int i = 0; i < m; ++i)
	{
		for (int j = 0; j < k; ++j)
		{
			int tmp = 0.0;
			for (int h = 0; h <n; ++h)
			{
				tmp += h_m[i *n + h] *h_n[h * k +j];
			}
			h_result[i *k +j]= tmp;
		}
	}
}
简单示例:
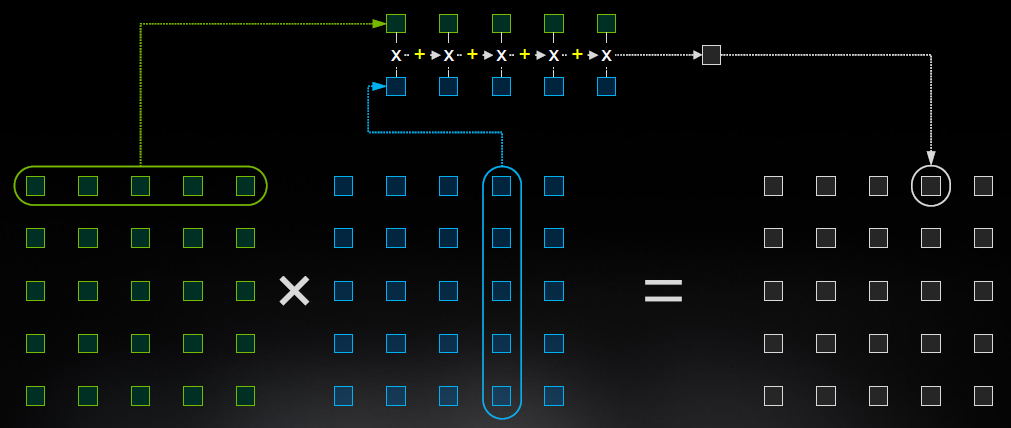
矩阵相乘样例 #
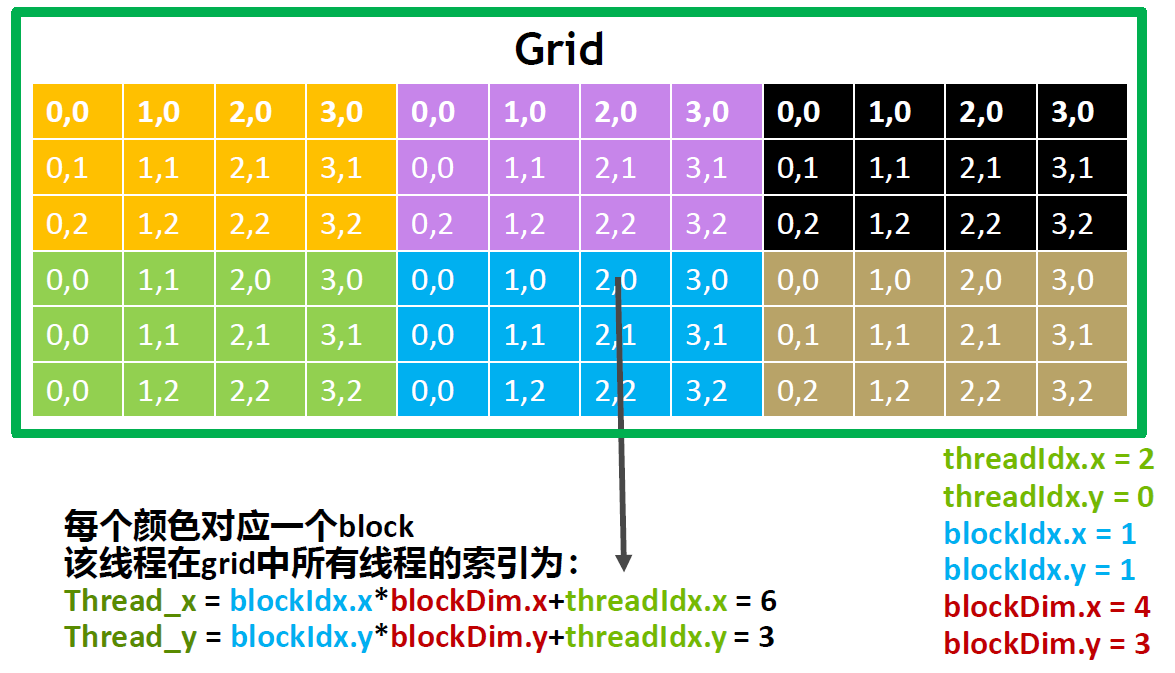
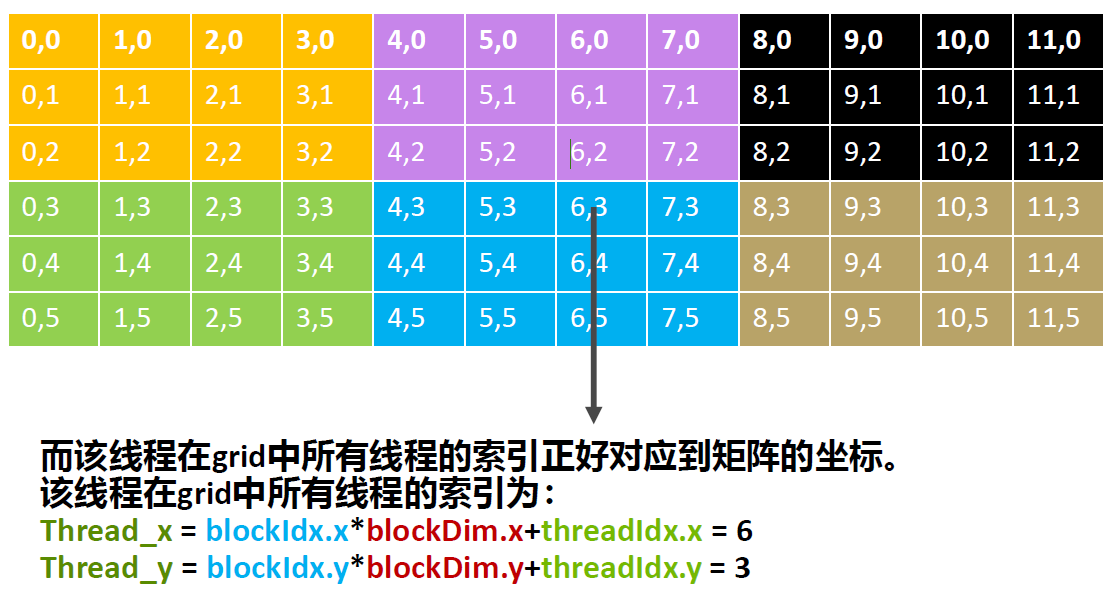
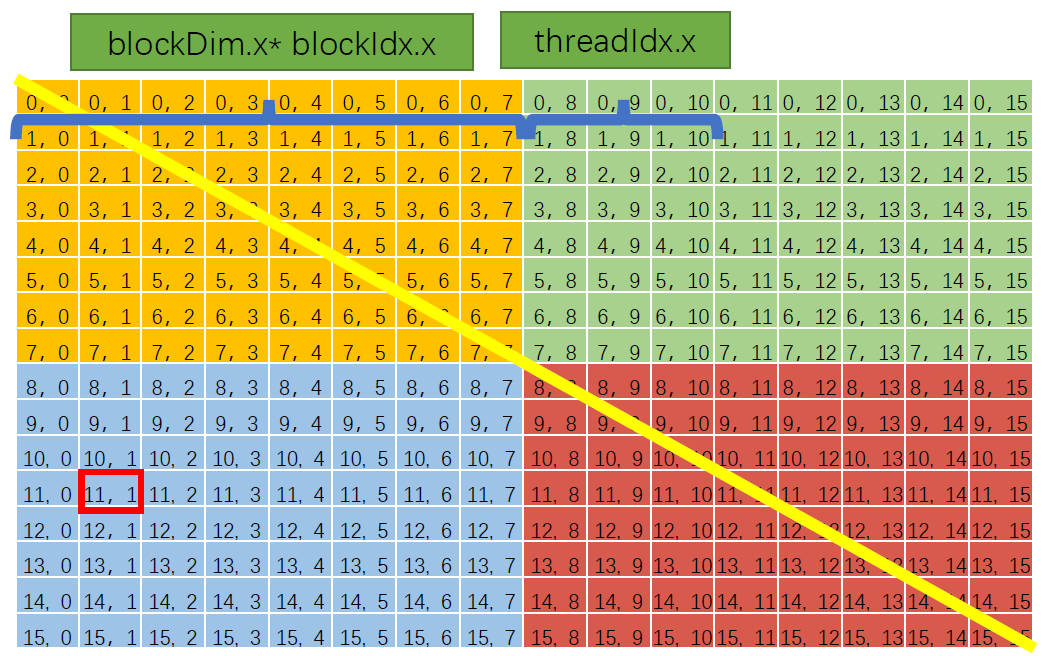
该线程在 x 和 y 方向上的索引计算方法分别如上所示。例如上图中例子蓝色 (2,0),其对应的参数在右下角。
Thread_x = blockIdx.x * blockDim.x + threadIdx.x
Thread_y = blockIdx.y * blockDim.y + threadIdx.y
当把整个 grid 对应到一个矩阵的时候,它就像下面的样子:
实际 x 与 y 坐标都是在 memory 中都是以一维的方式存储的,因此会涉及到计算一维 index 的情况。
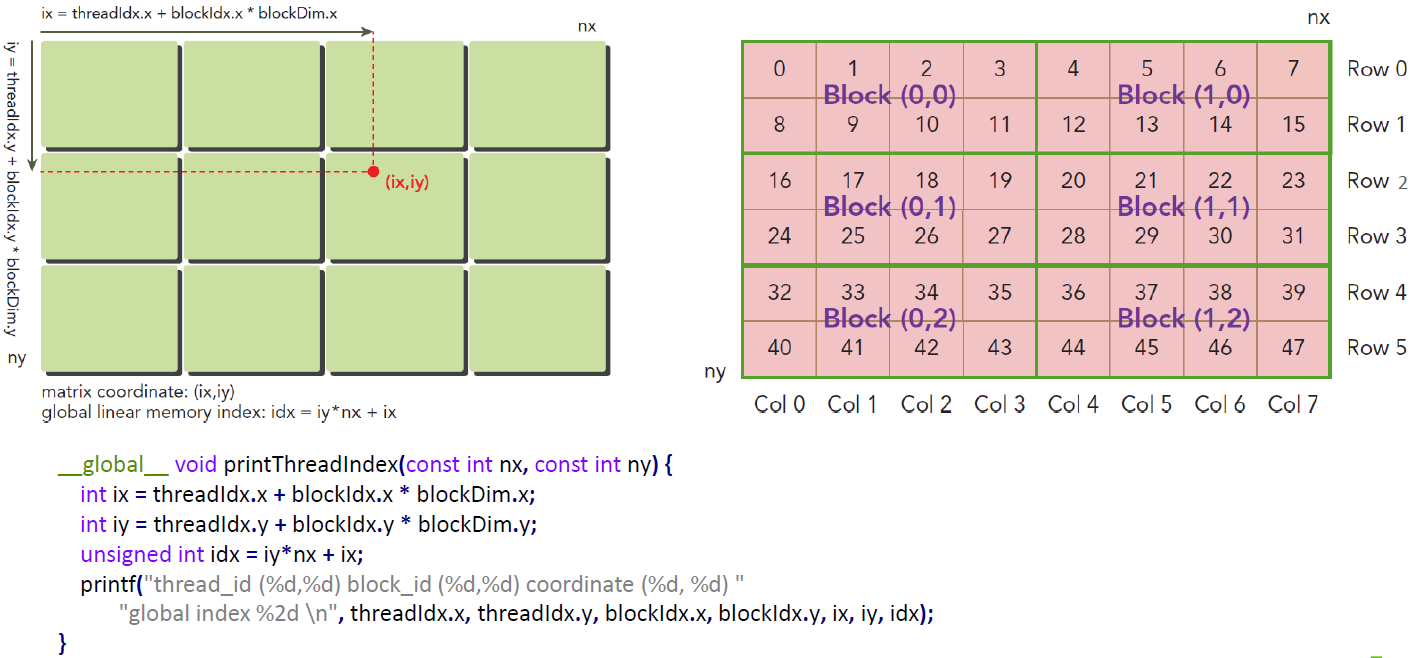
__global__ void printThreadIndex(const int nx, const int ny){
	int ix = threadldx.x + blockldx.x *blockDim.x;
	int iy = threadldx.y + blockldx.y *blockDim.y;
	unsigned int idx = iy*nx + ix;
	printf("thread_id (%d,%d) block_id (%d ,%d) coordinate (%d, %d) "
	"global index %2d \n", threadldx.x, threadldx.y, blockldx.x, blockldx.y, ix, iy, idx);
}
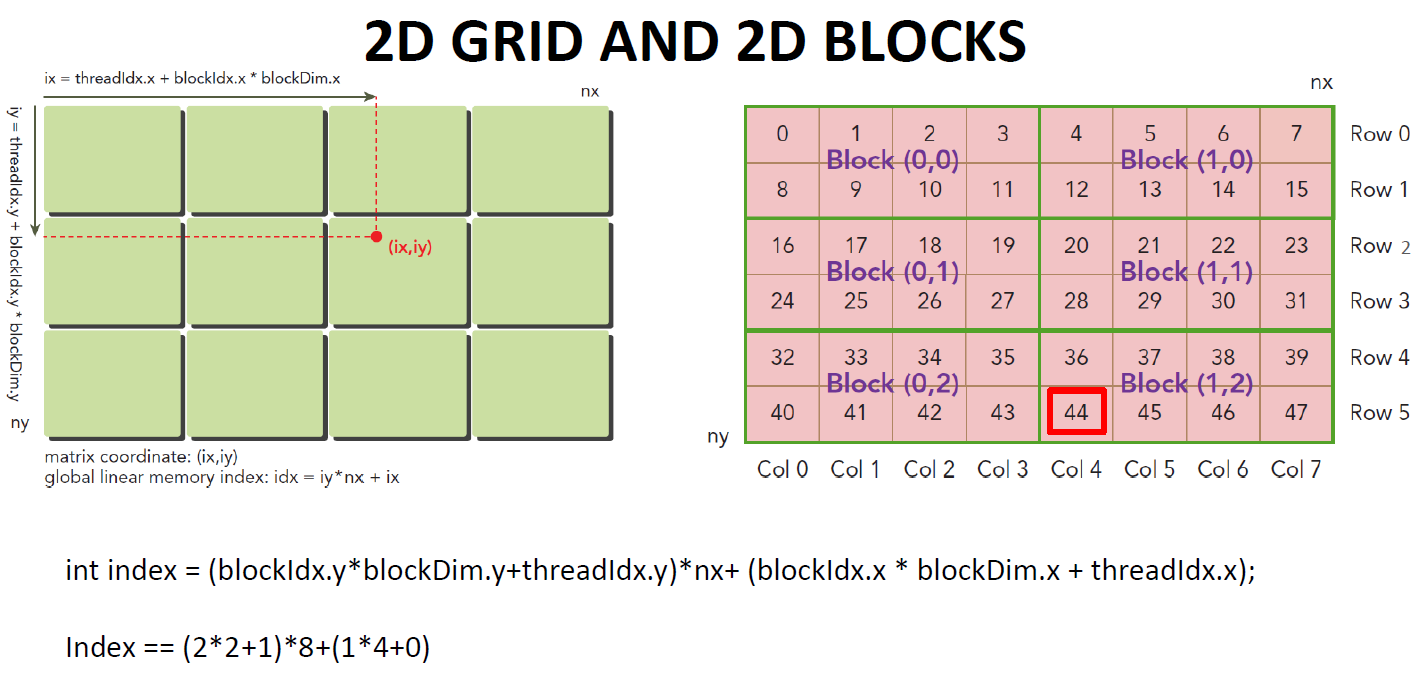
index 的计算方式如下:
idx = iy*nx + ix;
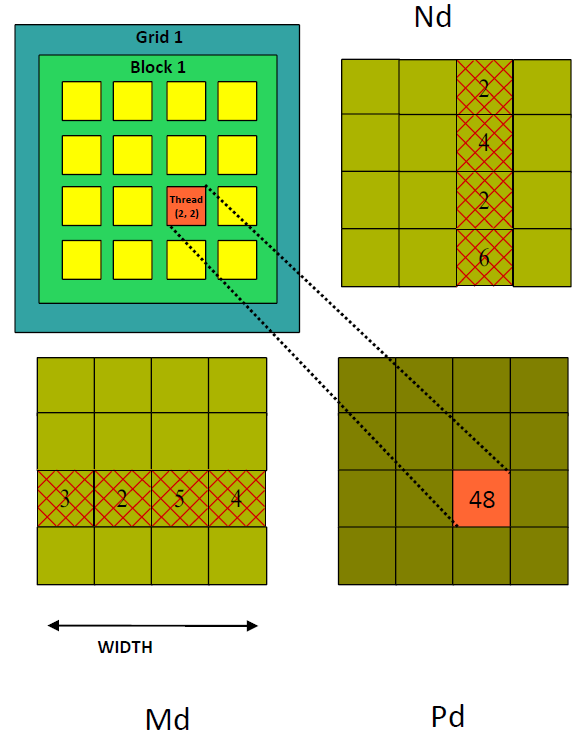
一个线程 grid 计算 Pd
- 每个线程计算 Pd 的一个元素 每个线程
- 读入矩阵 Md 的一行
- 读入矩阵 Nd 的一列
- 为每对 Md 和 Nd 元素执行一次乘法和加法
__global__ void gpu_matrix_mult(int *M,int*N, int *P, intm_size, int n_size, int k_size)
{
	// 计算出当前执行的线程在所有线程中的坐标
	// 注意 矩阵的行是通过 y 表示的
	// 矩阵的列是通过 x 表示的
	int row = blockldx.y * blockDim.y + threadldx.y;
	int col = blockldx.x * blockDim.x + threadldx.x;
	int sum = o;
	// 读取 M 矩阵的一行, N 矩阵的一列,并做乘积累加
	if( col <k_size && row < m_size)
	{
		for(int i = 0; i<n; i++)
		{
		sum += M[row *n_size + i]*N[i *k_size + col];
		}
		P[row * k_size + col] = sum;
	}
}
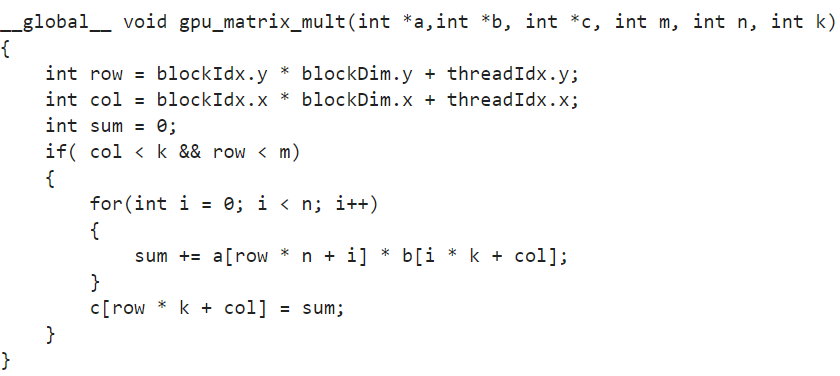
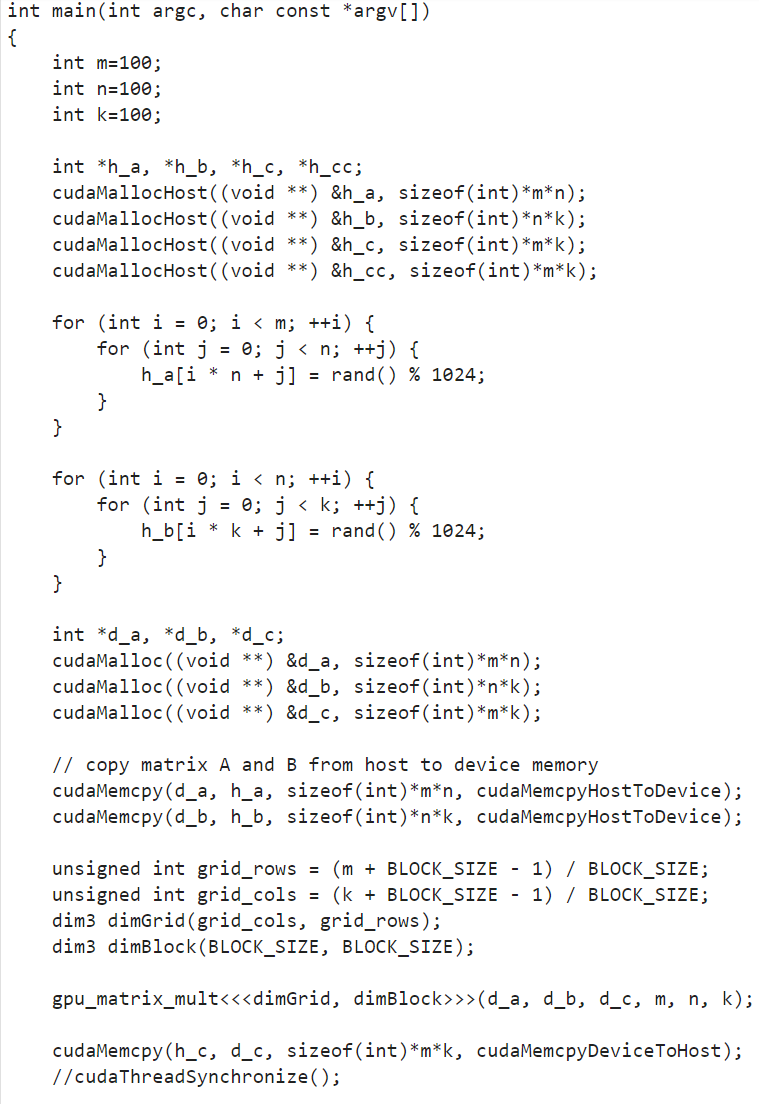
完整代码 #
矩阵转置 #
__global__ void gpu_transpose(int *in,int *out,int width)
{
	int y = blockIdx.y * blockDim.y + threadIdx.y;
	int x = blockIdx.x * blockDim.x + threadIdx.x;
	if( y < width && x < width)
	{
	out[x * width + y] = in[y * width + ×];
	}
}
CUDA 矩阵乘法代码实践 #
通过向量加法,我们已经学会了如何调用线程。接下来,我们来实践一下,如何利用 Cuda 处理矩阵。今天的目标是:
- 二维矩阵的乘法
- 二维矩阵的转置
- 如何分配线程和GPU存储单元
1.矩阵乘法是科学计算和深度学习领域常见的操作,我们先来看一看 CPU 代码如何处理矩阵乘法
void cpu_matrix_mult(int *h_a, int *h_b, int *h_result, int m, int n, int k)
{
    for (int i = 0; i < m; ++i)
    {
        for (int j = 0; j < k; ++j)
        {
            int tmp = 0;
            for (int h = 0; h < n; ++h)
            {
                tmp += h_a[i * n + h] * h_b[h * k + j];
            }
            h_result[i * k + j] = tmp;
        }
    }
}
这时,我们看到在 CPU 代码中,需要嵌套三个 for 循环,也就是说 CPU 的线程会一个接一个的求结果矩阵中的每一个数值,直到处理完所有数值。那么,我们在 GPU 中就可以申请很多个线程,每个线程来求结果矩阵中的一个数值,并同时完成
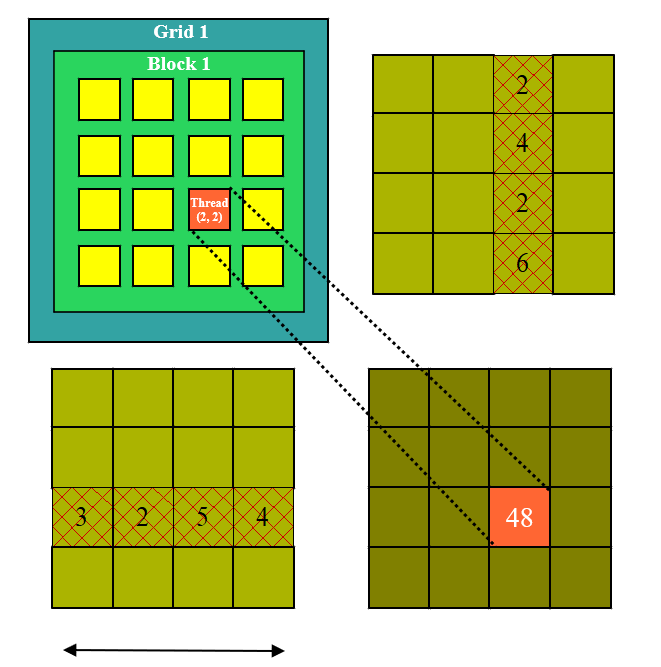
那么,首先我们要得到每一个执行线程,在 Grid 所有线程中的(x,y)坐标,即(Thread_x, Thread_y)。也就是说,以上面的 CPU 代码为例,我们要让编号为(Thread_x, Thread_y)的线程读取 a 矩阵中的一行和 b 矩阵中的一列,然后把对应元素乘积并累加。
接下来我们要考虑另一个问题: 如何将二维矩阵的坐标映射到一维,我们知道二维矩阵实际在计算机系统中, 也是以一维连续地址进行存储的, 如下图所示:
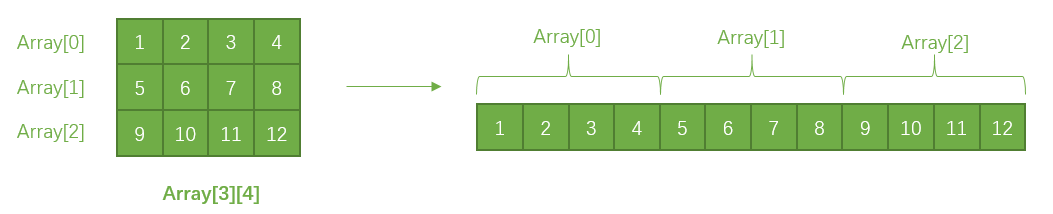
那么, 我们假设一个矩阵的宽高分别为: width 和height, 那么一个坐标为(x,y)的元素, 他在该矩阵的一维索引值就应该是:
y * width + x
注意: 通常我们定义一个矩阵为m * n, 那么表示它有m行, n列. 对应到上面是, width == n && height == m
明白了上述原理, 我们就可以很轻松的通过 CUDA 线程中的索引值, 找到需要处理的数据。
#include <stdio.h>
#include <math.h>

#define BLOCK_SIZE 16

__global__ void gpu_matrix_mult(int *a,int *b, int *c, int m, int n, int k)
{
    int row = blockIdx.y * blockDim.y + threadIdx.y;
    int col = blockIdx.x * blockDim.x + threadIdx.x;
    int sum = 0;
    if( col < k && row < m)
    {
        for(int i = 0; i < n; i++)
        {
            sum += a[row * n + i] * b[i * k + col];
        }
        c[row * k + col] = sum;
    }
}

void cpu_matrix_mult(int *h_a, int *h_b, int *h_result, int m, int n, int k) {
    for (int i = 0; i < m; ++i)
    {
        for (int j = 0; j < k; ++j)
        {
            int tmp = 0.0;
            for (int h = 0; h < n; ++h)
            {
                tmp += h_a[i * n + h] * h_b[h * k + j];
            }
            h_result[i * k + j] = tmp;
        }
    }
}

int main(int argc, char const *argv[])
{
    int m=100;
    int n=100;
    int k=100;

    int *h_a = (int*)malloc(sizeof(int)*m*n);
    int *h_b = (int*)malloc(sizeof(int)*n*k);
    int *h_c = (int*)malloc(sizeof(int)*m*k);
    int *h_cc = (int*)malloc(sizeof(int)*m*k);

    for (int i = 0; i < m; ++i) {
        for (int j = 0; j < n; ++j) {
            h_a[i * n + j] = rand() % 1024;
        }
    }

    for (int i = 0; i < n; ++i) {
        for (int j = 0; j < k; ++j) {
            h_b[i * k + j] = rand() % 1024;
        }
    }

    int *d_a, *d_b, *d_c;
    cudaMalloc((void **) &d_a, sizeof(int)*m*n);
    cudaMalloc((void **) &d_b, sizeof(int)*n*k);
    cudaMalloc((void **) &d_c, sizeof(int)*m*k);

    // copy matrix A and B from host to device memory
    cudaMemcpy(d_a, h_a, sizeof(int)*m*n, cudaMemcpyHostToDevice);
    cudaMemcpy(d_b, h_b, sizeof(int)*n*k, cudaMemcpyHostToDevice);

    unsigned int grid_rows = (m + BLOCK_SIZE - 1) / BLOCK_SIZE;
    unsigned int grid_cols = (k + BLOCK_SIZE - 1) / BLOCK_SIZE;
    dim3 dimGrid(grid_cols, grid_rows);
    dim3 dimBlock(BLOCK_SIZE, BLOCK_SIZE);

    gpu_matrix_mult<<<dimGrid, dimBlock>>>(d_a, d_b, d_c, m, n, k);

    cudaMemcpy(h_c, d_c, sizeof(int)*m*k, cudaMemcpyDeviceToHost);
    //cudaThreadSynchronize();

    cpu_matrix_mult(h_a, h_b, h_cc, m, n, k);

    int ok = 1;
    for (int i = 0; i < m; ++i)
    {
        for (int j = 0; j < k; ++j)
        {
            if(fabs(h_cc[i*k + j] - h_c[i*k + j])>(1.0e-10))
            {

                ok = 0;
            }
        }
    }

    if(ok)
    {
        printf("Pass!!!\n");
    }
    else
    {
        printf("Error!!!\n");
    }

    // free memory
    cudaFree(d_a);
    cudaFree(d_b);
    cudaFree(d_c);
    return 0;
}
!/usr/local/cuda/bin/nvcc matrix_mul.cu -o matrix_mul
!./matrix_mul
利用 nvprof 来查看程序性能
!sudo /usr/local/cuda/bin/nvprof ./matrix_mul
修改矩阵大小为 1000*1000,并查看效果。
2.矩阵转置
矩阵转置也是在众多科学计算中常用的方法, 我们先来看下 CPU 如何处理二维矩阵转置:
void cpu_matrix_transpose(int in[N][M], int out[M][N])
{
    for(int y = 0; y < N; y++)
    {
        for(int x = 0; x < M; x++)
        {
            out[x][y] = in[y][x];
        }
    }
}
接下来, 我们尝试用 GPU 加速这一过程
#include <stdio.h>
#include <math.h>

#define BLOCK_SIZE 16

__global__ void gpu_transpose(int *in,int *out, int width)
{
    int y = blockIdx.y * blockDim.y + threadIdx.y;
    int x = blockIdx.x * blockDim.x + threadIdx.x;

    if( y < width && x < width)
    {
        out[x * width + y] = in[y * width + x];
    }
}

void cpu_matrix_transpose(int *in, int *out, int width)
{
    for(int y = 0; y < width; y++)
    {
        for(int x = 0; x < width; x++)
        {
            out[x * width + y] = in[y * width + x];
        }
    }
}

int main(int argc, char const *argv[])
{
    int m=1000;
    int *h_in = (int*)malloc(sizeof(int)*m*m);
    int *h_out = (int*)malloc( sizeof(int)*m*m );
    int *h_cpu_out = (int*)malloc( sizeof(int)*m*m);


    for (int i = 0; i < m; ++i) {
        for (int j = 0; j < m; ++j) {
            h_in[i * m + j] = rand() % 1024;
        }
    }


    int *d_out, *d_in;
    cudaMalloc((void **) &d_out, sizeof(int)*m*m);
    cudaMalloc((void **) &d_in, sizeof(int)*m*m);


    // copy matrix A and B from host to device memory
    cudaMemcpy(d_in, h_in, sizeof(int)*m*m, cudaMemcpyHostToDevice);


    unsigned int grid_rows = (m + BLOCK_SIZE - 1) / BLOCK_SIZE;
    unsigned int grid_cols = (m + BLOCK_SIZE - 1) / BLOCK_SIZE;
    dim3 dimGrid(grid_cols, grid_rows);
    dim3 dimBlock(BLOCK_SIZE, BLOCK_SIZE);

    gpu_transpose<<<dimGrid, dimBlock>>>(d_in, d_out, m);

    cudaMemcpy(h_out, d_out, sizeof(int)*m*m, cudaMemcpyDeviceToHost);
    //cudaThreadSynchronize();

    cpu_matrix_transpose(h_in, h_cpu_out,m);

    int ok = 1;
    for (int i = 0; i < m; ++i)
    {
        for (int j = 0; j < m; ++j)
        {
            if(fabs(h_out[i*m + j] - h_cpu_out[i*m + j])>(1.0e-10))
            {

                ok = 0;
            }
        }
    }

    if(ok)
    {
        printf("Pass!!!\n");
    }
    else
    {
        printf("Error!!!\n");
    }

    // free memory
    cudaFree(d_in);
    cudaFree(d_out);

    return 0;
}
!/usr/local/cuda/bin/nvcc transpose.cu -o transpose
!./transpose
课后思考:
- 当我们能申请的线程数很少,远远不够的时候怎么办?
- 修改
im2gray.cu, 完成将 RGB 图像转化为灰度图的程序。
#include <opencv2/opencv.hpp>
#include <iostream>

using namespace std;
using namespace cv;

//将RGB图像转化成灰度图
//out = 0.3 * R + 0.59 * G + 0.11 * B
__global__ void im2gray(uchar3 *in, unsigned char *out, int height, int width)
{
    int x = threadIdx.x + blockIdx.x * blockDim.x;
    int y = threadIdx.y + blockIdx.y * blockDim.y;

    if (x < width && y < height)
    {
        uchar3 bgr = in[y * width + x];

        out[y * width + x] = 0.30f * bgr.z + 0.59f * bgr.y + 0.11f * bgr.x;
    }
}

int main()
{
    Mat src = imread("1.jpg");

    uchar3 *d_in;
    unsigned char *d_out;

    int height = src.rows;
    int width = src.cols;
    Mat grayImg(height, width, CV_8UC1, Scalar(0));

    cudaMalloc((void**)&d_in, height * width * sizeof(uchar3));
    cudaMalloc((void**)&d_out, height * width * sizeof(unsigned char));

    cudaMemcpy(d_in, src.data, height * width * sizeof(uchar3), cudaMemcpyHostToDevice);

    dim3 threadsPerBlock(32, 32);
    dim3 blocksPerGrid((width + threadsPerBlock.x - 1) / threadsPerBlock.x, (height + threadsPerBlock.y - 1) / threadsPerBlock.y);

    im2gray<<<blocksPerGrid, threadsPerBlock>>>(d_in, d_out, height, width);


    cudaMemcpy(grayImg.data, d_out, height * width * sizeof(unsigned char), cudaMemcpyDeviceToHost);

    imwrite("save.png", grayImg);
    cudaFree(d_in);
    cudaFree(d_out);

    return 0;
}
Related readings
- CUDA Thread Indexing
- Writing Your First CUDA Program
- CUDA Programming Model
- GPU Hardware Architecture
- Introduction to CUDA and Linux Basics
If you want to follow my updates, or have a coffee chat with me, feel free to connect with me: