Writing Your First CUDA Program
August 2, 2023 · 7 min read
If you have any questions, feel free to comment below. Click the block can copy the code.
And if you think it's helpful to you, just click on the ads which can support this site. Thanks!
从第一个 CUDA 程序开始,实践 NVCC 编译、Makefile、多文件编译、线程索引和性能分析。
编写第一个 Cuda 程序 #
- 关键词:
__global__,<<<...>>>,.cu在当前的目录下创建一个名为hello_cuda.cu的文件,编写第一个Cuda程序: 当我们编写一个hello_word程序的时候,我们通常会这样写:
    #include <stdio.h>

    void hello_from_cpu()
    {
        printf("Hello World from the CPU!\n");
    }

    int main(void)
    {
        hello_from_cpu();
        return 0;
    }
- 如果我们要把它改成调用 GPU 的时候,我们需要在 void hello_from_cpu ()之前加入 __global__标识符,并且在调用这个函数的时候添加«<…»>来设定你需要多少个线程来执行这个函数,这里调用 GPU 做修改如下:
#include <stdio.h>

__global__ void hello_from_gpu()
{
    printf("Hello World from the GPU!\n");
}

int main(void)
{
    hello_from_gpu<<<1, 1>>>();
    cudaDeviceSynchronize();
    return 0;
}
内核启动是异步的,这意味着在内核完成执行之前,他将在启动 gpu 进程后立即将控制权返回给 cpu 线程,而 cpu 线程的下一步是应用程序的退出,在应用程序退出时,其将输出发送到标准输出的功能由操作系统终止,因此内核以后生成的输出无处可去,将无法看到它。
因此,cudaDeviceSynchronize() 在 gpu 完成之前交给 cpu, cpu 用内核去找到出口,将 gpu 进程的返回值进行保存或者输出等。
利用 NVCC 进行编译 #
编写完成之后,我们要开始编译并执行程序,在这里我们可以利用nvcc进行编译,指令如下:
!/usr/local/cuda/bin/nvcc hello_cuda.cu -o hello_cuda -run
# Hello World from the GPU!
编写 Makefile 文件 #
这里我们也可以利用编写 Makefile 的方式来进行编译,一个简单的例子可以参考如下:
TEST_SOURCE = hello_cuda.cu

TARGETBIN := ./hello_cuda


CC = /usr/local/cuda/bin/nvcc

$(TARGETBIN):$(TEST_SOURCE)
	$(CC)  $(TEST_SOURCE) -o $(TARGETBIN)

.PHONY:clean
clean:
	-rm -rf $(TARGETBIN)
	-rm -rf *.o
然后直接
!make
# make: 'hello_cuda' is up to date.
然后我们就可以得到一个名为 hello_cuda 的程序,我们开始执行一下
!./hello_cuda
# Hello World from the GPU!
接下来我们尝试多个文件协同编译, 修改 Makefile 文件:
- 编译
hello_from_gpu.cu文件生成hello_from_gpu.o - 编译
hello_cuda_01.cu和上一步生成的hello_from_gpu.o, 生成./hello_cuda_multi_file
TEST_SOURCE = hello_cuda_01.cu

TARGETBIN := ./hello_cuda_multi_file

CC = /usr/local/cuda/bin/nvcc


$(TARGETBIN):hello_cuda02-test.cu hello_from_gpu.o
	$(CC)  $(TEST_SOURCE) hello_from_gpu.o -o $(TARGETBIN)

hello_from_gpu.o:hello_from_gpu.cu
	$(CC) --device-c hello_from_gpu.cu -o hello_from_gpu.o


.PHONY:clean
clean:
	-rm -rf $(TARGETBIN)
	-rm -rf *.o
然后执行
#此处通过-f来指定您使用的编译文件
!make -f Makefile_Multi_file
# /usr/local/cuda/bin/nvcc --device-c hello_from_gpu.cu -o hello_from_gpu.o
# /usr/local/cuda/bin/nvcc hello_cuda_01.cu hello_from_gpu.o -o ./hello_cuda_multi_file
!./hello_cuda_multi_file
# Hello World from the GPU!
!make -f Makefile_Multi_file clean
# rm -rf ./hello_cuda_multi_file
# rm -rf *.o
线程索引 #
当我们在讨论 GPU 和 CUDA 时,我们一定会考虑如何调用每一个线程,如何定为每一个线程。其实,在 CUDA 编程模型中,每一个线程都有一个唯一的标识符或者序号,而我们可以通过 threadIdx 来得到当前的线程在线程块中的序号,通过 blockIdx 来得到该线程所在的线程块在 grid 当中的序号,即:
- threadIdx.x 是执行当前kernel函数的线程在block中的x方向的序号
- blockIdx.x 是执行当前kernel函数的线程所在block,在grid中的x方向的序号
- blockDim.x 是执行当前kernel函数的线程所在的block在x方向包含多少个线程
- gridDim.x 是执行当前kernel函数的grid在x方向包含多少个block
接下来创建 Index_of_thread.cu 文件,并在核函数中打印执行该核函数的线程编号和所在的线程块的编号。
#include <stdio.h>

__global__ void hello_from_gpu()
{
    const int bid = blockIdx.x;
    const int tid = threadIdx.x;
    printf("Hello World from block %d and thread %d!\n", bid, tid);
}

int main(void)
{
    hello_from_gpu<<<33, 5>>>();
    cudaDeviceSynchronize();
    return 0;
}
创建好了之后,开始编译
!/usr/local/cuda/bin/nvcc Index_of_thread.cu -o Index_of_thread
执行 Index_of_thread
!./Index_of_thread
# Hello World from block 12 and thread 0!
# Hello World from block 12 and thread 1!
# Hello World from block 12 and thread 2!
# Hello World from block 12 and thread 3!
# Hello World from block 12 and thread 4!
# Hello World from block 32 and thread 0!
# Hello World from block 32 and thread 1!
# Hello World from block 32 and thread 2!
# Hello World from block 32 and thread 3!
# Hello World from block 32 and thread 4!
# Hello World from block 17 and thread 0!
# Hello World from block 17 and thread 1!
# Hello World from block 17 and thread 2!
# ...
利用 nvprof 查看程序性能 #
!/usr/local/cuda/bin/nvprof  ./Index_of_thread
# ==22047== NVPROF is profiling process 22047, command: ./Index_of_thread
# Hello World from block 14 and thread 0!
# Hello World from block 14 and thread 1!
# Hello World from block 14 and thread 2!
# ...
# ==22047== Profiling application: ./Index_of_thread
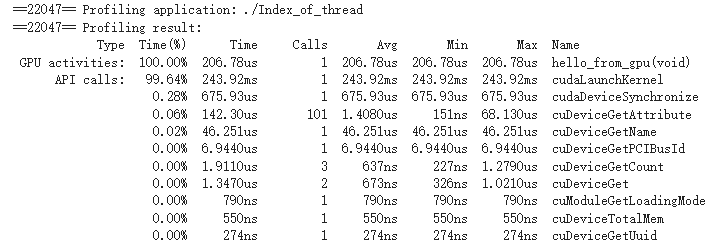
- Profiling result:是 GPU(kernel 函数)上运行的时间
- API calls:是在 cpu 上测量的程序调用 API 的时间
拓展:
- 利用 Makefile 规则,尝试编写批量编译工具,比如:同时编译5个 cuda 程序。
- 利用Makefile规则,尝试加入链接库,比如:加入cuBLAS库编译cuda程序。
- 阅读Cuda sample code,尝试编写程序得到当前GPU的属性参数等。
- 阅读 nvprof[1] 说明文档,了解更多 nvprof 的使用方法。
References
Related readings
- CUDA Programming Model
- GPU Hardware Architecture
- Introduction to CUDA and Linux Basics
- Introduction to CUDA
- AI开发硬件环境综述
If you want to follow my updates, or have a coffee chat with me, feel free to connect with me: