Overview of the AI Development Software Environment
March 14, 2023 · 6 min read
If you have any questions, feel free to comment below. Click the block can copy the code.
And if you think it's helpful to you, just click on the ads which can support this site. Thanks!
Regarding software:
- Installation of the ubuntu operating system
- Abandon bash, embrace zsh
- Use of package managers,
- Install the NVIDIA GPU driver
- Software installation:Miniconda
- Software installation:Python IDE
- Software installation: ssh
- Software installation:Git
- Installation of other productivity software
Installation of the ubuntu operating system #
ISO Files for different ubuntu versions: https://cn.ubuntu.com/download[1] Note: the graphics card in a windows virtual machine is simulated by the physical CPU and does not invoke the physical GPU, so installing ubuntu in a virtual machine cannot be used for deep learning training.
Learn Unix:https://www.tutorialspoint.com/unix[2]
Abandon bash, embrace zsh #
A shell refers to an application that provides an interface through which users access the services of the operating system kernel. A shell script is a script program written for a shell.
Current mainstream operating systems all support shell programming:
Windows PowerShell was created to provide a command-line shell with functionality equivalent to that of UNIX systems (for example: sh, bash, or csh), while also including a built-in scripting language and tools that assist script programs. To also use tools such as grep, awk, and curl, it is best to install cygwin or mingw to simulate a linux environment.
● Powershell: https://docs.microsoft.com/zh-cn/[3]
● Cygwin:http://www.cygwin.com/[4]
● mingw:http://www.mingw.org/[5]
Mac OS not only comes with the two most basic interpreters, sh、bash, but also includes less commonly used interpreters such as ksh, csh, and zsh. The default shell in .macOS 10.15 Catalina is zsh.
Linux comes with a shell interpreter by default; ohmyzsh is recommended here.
ohmyzsh:https://github.com/ohmyzsh/ohmyzsh[6] 113k Str & Efficiency & Automatic Suggestion and completion & color display….
Use of software packages #
Windows commonly uses executable files represented by .exe and .msi to install applications. This method requires manual interaction and is inconvenient.
Microsoft launched a built-in package manager, winget. Users can complete installation without frequently clicking in windows.
Software packages:
.exe,.msiPackage manager:
wingethttps://github.com/microsoft/winget-cli[7]
Mac. commonly uses homebrew, an essential powerful tool
Software package: .dmg
Package manager: brew: https://brew.sh/index_zh-cn[8]
Tsinghua source: https://mirrors.tuna.tsinghua.edu.cn/help/homebrew/[9]
Linux.apt is an advanced linux tool used for debian-based package management, primarily an advanced tool used to automatically search for, install, upgrade, and uninstall software or operating systems from software repositories on the internet (the low-level tool for the debian family is dpkg)
Common installation methods:
Source code installation: ./configure => make => make install
Binary package installation: compiled and packaged by the software’s official source or a third party, and usable after decompression
Package manager installation: .deb, .rpm, .tar.gz
Commonly used package managers: yum, zypper, dpkg, apt….
Ubuntu Package Management:https://ubuntu.com/server/docs/package-management[10]
apt(Advanced Package Tool):debian-family package management.
Software repositories: aruman(Arch Linux), yum(CentOS7), apt(Ubuntu)
Install the NVIDIAI GPU driver #
Windows: #
GF is a graphics card tool launched by NVIDIA. GF connects to NVIDIA’s cloud data center and downloads the best game settings according to the PC’s CPU, GPU, and monitor configuration
Manually find NVIDIA:https://www.nvidia.cn/Download/index.aspx?lang=cn[11]
Automatically find: GeForce Experience
Linux: #
Manually find NVIDIA:https://www.nvidia.cn/Download/index.aspx?lang=cn[12]
Automatically find: NVIDIA:https://www.nvidia.cn/Download/index.aspx?lang=cn[13]
Method1: PPA -- This method cannot guarantee the security or latest version of the driver
Method2: CUDA Toolkit => Official documentation CUDA Installation Guide Linux
    S1: Install repository meta-data
    S2: Installing the CUDA public GPG key
    S3: Update the Apt repository cache
    S4: Install Driver
        apt-cache search nvidia-driver
        apt-get install nvidia-driver-435
    S5: reboot => Verify nvidia-smi
    S6: Install CUDA => Verify
        apt-get install cuda
        Do not keep selecting Yes. There is one place where NO is required; choose not to install the driver
    S7: Modify zsh
        export PATH=/usr/local/cuda-9.2/bin${PATH:+:${PATH}}
        export LD_LIBRARY_PATH=/usr/local/cuda-9.2/lib64${LD_LIBRARY_PATH:+:${LD_LIBRARY_PATH}}
        export CUDA_HOME=/usr/local/cuda-9.2
    S8: How to uninstall the installation
        apt-get --purge  autoremove nvidia*
        apt list --installed|grep cuda
        apt purge cuda-repo-ubuntu1804
        /usr/local/cuda-9.2/bin/cuda-uninstaller
        rm –f /usr/local/cuda-9.2
Method3: ubuntu-drivers --Not recommended
Software installation : ssh #
sudo apt-get install openssh-server
ssh user@remote -p port
# Copy a local file to the remote server
scp -P port /path/to/local/file user@remote:/path/to/remote/file
Software installation: Git #
I have previously written many articles about git, so I will not elaborate here.
Game: Learn Git Branching: https://learngitbranching.js.org/?locale=zh_CN[14]
Official documentation: https://git-scm.com/doc[15]
Commonly used ubuntu commands #
GPU:
# watch continuously -n1 interval refreshes once every 1s
watch -n1 nvidia-smi
CPU:
htop
Miniconda #
Miniconda is recommended instead of Anaconda. Anaconda includes a large collection of packages by default, many of which are unnecessary for a typical AI development environment. Miniconda provides only conda, Python, and essential dependencies, so it uses less disk space and allows packages to be installed as needed.
Miniconda download address: https://docs.anaconda.com/miniconda/[16]
It is recommended to install it on an SSD solid-state drive to speed up reading and writing.
Here is the installation for a remote server:
Because company/school AI clusters generally do not have a graphical interface, copy the download link for the 64-bit Linux installer from the Miniconda download page.
step1:Connect to the server according to IP/user_id/port
ssh [email protected] -p 2022
step2:Go to any directory to perform wget
cd Downloads
wget -c https://repo.anaconda.com/miniconda/Miniconda3-latest-Linux-x86_64.sh
step3:Install; just use the defaults Enter yes yes
sh Miniconda3-latest-Linux-x86_64.sh
The specific environment creation is omitted here, but it is worth noting that because MacOS does not have an NVDIA GPU, only the CPU version of pytorch can be installed.
Installation of TensorFlow and Pytorch
TensorFlow: https://www.tensorflow.org/installsource?hl=zh-cn#gpu[17] Different TensorFlow versions have strict corresponding CUDA requirements. If CUDA10.1 is installed on the system, installing tensorflow-2.40 will report an error; pay attention to version correspondence.
Pytorch: https://pytorch.org/get-started/previous-versions/[18] Compared with TensorFlow’s static graph mechanism, different versions of Pytorch, which is based on dynamic graphs, do not need to strictly correspond to the system CUDA; download information for different versions can be found at the link above.
Selection of Python software libraries
anaconda: https://anaconda.org/anaconda/repo[19] There are many packages in it; open one to see the specific installation command.
Pypi org: https://pypi.org[20] Same as above; pip is recommended
Replace with the Tsinghua source Address: https://mirrors.tuna.tsinghua.edu.cn[21]
step1:Activate your own conda environment
step2:For windows systems, generate a .condarc file and search globally to find the .condarc file
conda config -set show_channel_ruls yes
step3:For MacOS/ubuntu systems, find the .condarc file in homelxxx (xxx is your username) and replace the Tsinghua source address
vim / home/wlsh/ .condarc
Jupyter Lab #
Local use #
For windows/macOS/ubuntu systems with graphical interfaces
- Activate the conda environment in the terminal, then enter
jupyter labto open it directly
Server use #
step1: Connect to the cluster through IP/use_id/port
ssh [email protected] -p 2022
step2: Activate your own conda environment
conda activate Env_name
step3: Install jupyterlab and add Environment to Jupyterlab
pip install jupyterlab
python -m ipykernel install --user --name Env_name
step4: Generate the jupyter lab configuration file
jupyter lab --generate-config
The terminal shows that the generated configuration file is located at
/home/frank/.jupyter/jupyter_lab_config.py
step5: Change the login password
Jupyter lab password
step6: Host IP/port settings; edit the file and add three lines at the end.
vim /home/frank/.jupyter/jupyter_lab_config.py
c.NotebookApp.ip='*'# Allow connections from any IP
c.NotebookApp.open_browser=False #Do not open the graphical interface
c.NotebookApp.port=8888 # Initial port; if it conflicts, it will replace it by itself
The meanings of these three lines are respectively to allow connections from any IP, not open jupyter lab’s graphical interface on the cluster, and have the initial server port IP replace itself if it encounters a conflict.
step7: Start jupyter lab, mount it in the server background, and view its result output; after viewing it, you can find the IP. Then replace localhost with the server IP and open it in your own laptop browser.
nohup jupyter lab --port=8891 & cat nohup.out

step8: If you want to close it, just find it and close it.
ps -ef | grep jupyter lab
Kill -9 XXXX
Vscode configuration #
Recommended extensions:
Simplified Chinese=>Chinese interface
Python =>Manage and switch python environments
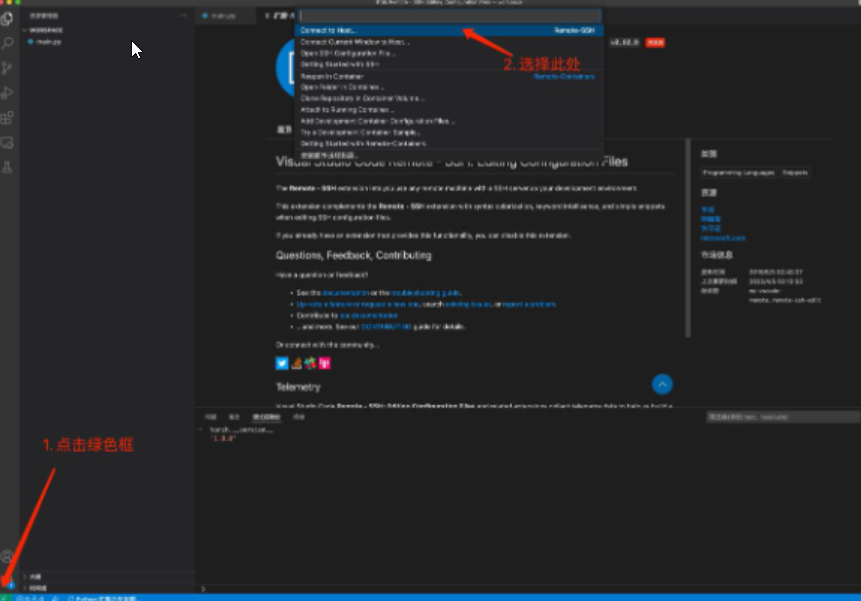
Remote-SSH =>Server connection
Remote-SSH: Editing Configuration Files
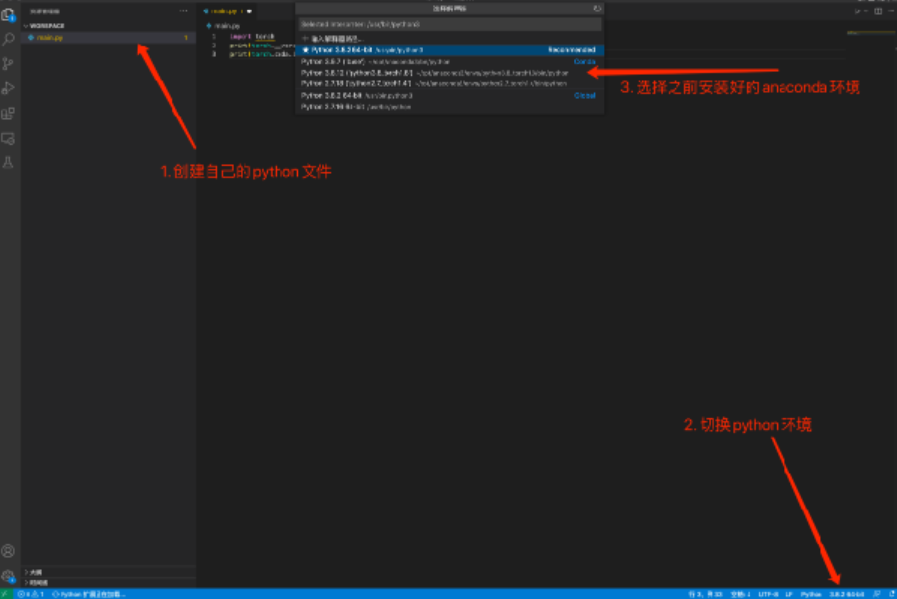
Remote configuration
Configure SSH - Official documentation: Remote Development Tips and Tricks
ssh-keygen -t rsa -b 4096 #Generate the local public key for mac/ubuntu
ssh-copy-id -p 2022 frank@10. 19.124.245#Copy this key to the remote host
The above is the configuration for py files, while the configuration of jupyter notebook is slightly different from this, but not by much. Search for and solve it yourself. It still involves opening a port on the server and mounting it in the background, then clicking Jupyter Local –> Existing url –> replacing localhost with the server IP and entering it.

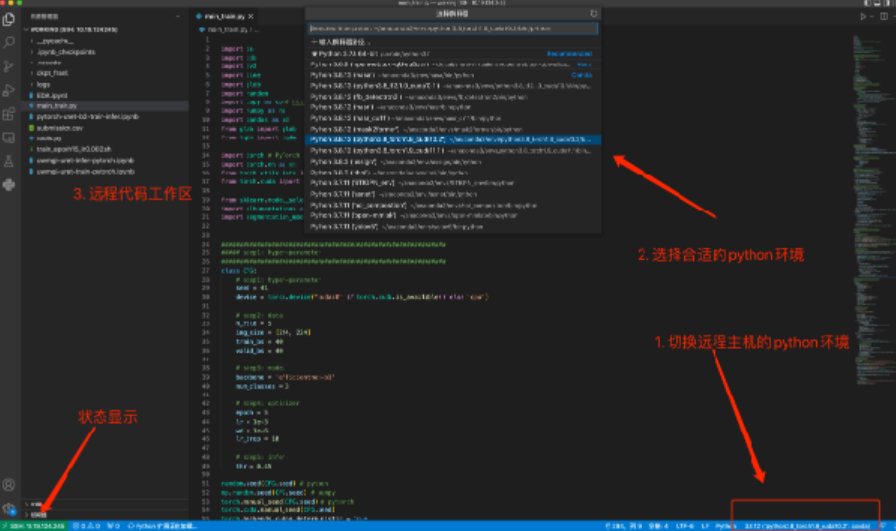
In addition, markdown and latex environments can also be configured. Note: latex also requires installing a compiler; install TexLive on windows and macTex on Mac.
References
- https://cn.ubuntu.com/download ↩︎
- https://link.zhihu.com/?target=https%3A//www.tutorialspoint.com/unix/unix-what-is-shell.htm ↩︎
- https://link.zhihu.com/?target=https%3A//docs.microsoft.com/zh-cn/ ↩︎
- https://link.zhihu.com/?target=http%3A//www.cygwin.com/ ↩︎
- https://link.zhihu.com/?target=http%3A//www.mingw.org/ ↩︎
- https://link.zhihu.com/?target=https%3A//github.com/ohmyzsh/ohmyzsh ↩︎
- https://link.zhihu.com/?target=https%3A//github.com/microsoft/winget-cli ↩︎
- https://link.zhihu.com/?target=https%3A//brew.sh/index_zh-cn ↩︎
- https://link.zhihu.com/?target=https%3A//mirrors.tuna.tsinghua.edu.cn/help/homebrew/ ↩︎
- https://link.zhihu.com/?target=https%3A//ubuntu.com/server/docs/package-management ↩︎
- https://link.zhihu.com/?target=https%3A//www.nvidia.cn/Download/index.aspx%3Flang%3Dcn ↩︎
- https://link.zhihu.com/?target=https%3A//www.nvidia.cn/Download/index.aspx%3Flang%3Dcn ↩︎
- https://link.zhihu.com/?target=https%3A//www.nvidia.cn/Download/index.aspx%3Flang%3Dcn ↩︎
- https://link.zhihu.com/?target=https%3A//learngitbranching.js.org/%3Flocale%3Dzh_CN ↩︎
- https://link.zhihu.com/?target=https%3A//git-scm.com/doc ↩︎
- https://docs.anaconda.com/miniconda/ ↩︎
- https://www.tensorflow.org/installsource?hl=zh-cn#gpu ↩︎
- https://pytorch.org/get-started/previous-versions/ ↩︎
- https://anaconda.org/anaconda/repo ↩︎
- https://pypi.org ↩︎
- https://mirrors.tuna.tsinghua.edu.cn ↩︎
Related readings
If you want to follow my updates, or have a coffee chat with me, feel free to connect with me: